


Posted By

Blue-green deployment is a powerful technique for minimizing downtime and risks during software updates. This method involves maintaining two identical environments, referred to as "blue" and "green." Only one of these environments is live, serving all production traffic at any given time. It involves deploying a new version of your application in an environment that is not currently live, allowing for a seamless transition and minimal disruption to users. After testing and verifying the new version in this environment, you switch the router or load balancer to direct traffic to it, making it the new production environment.
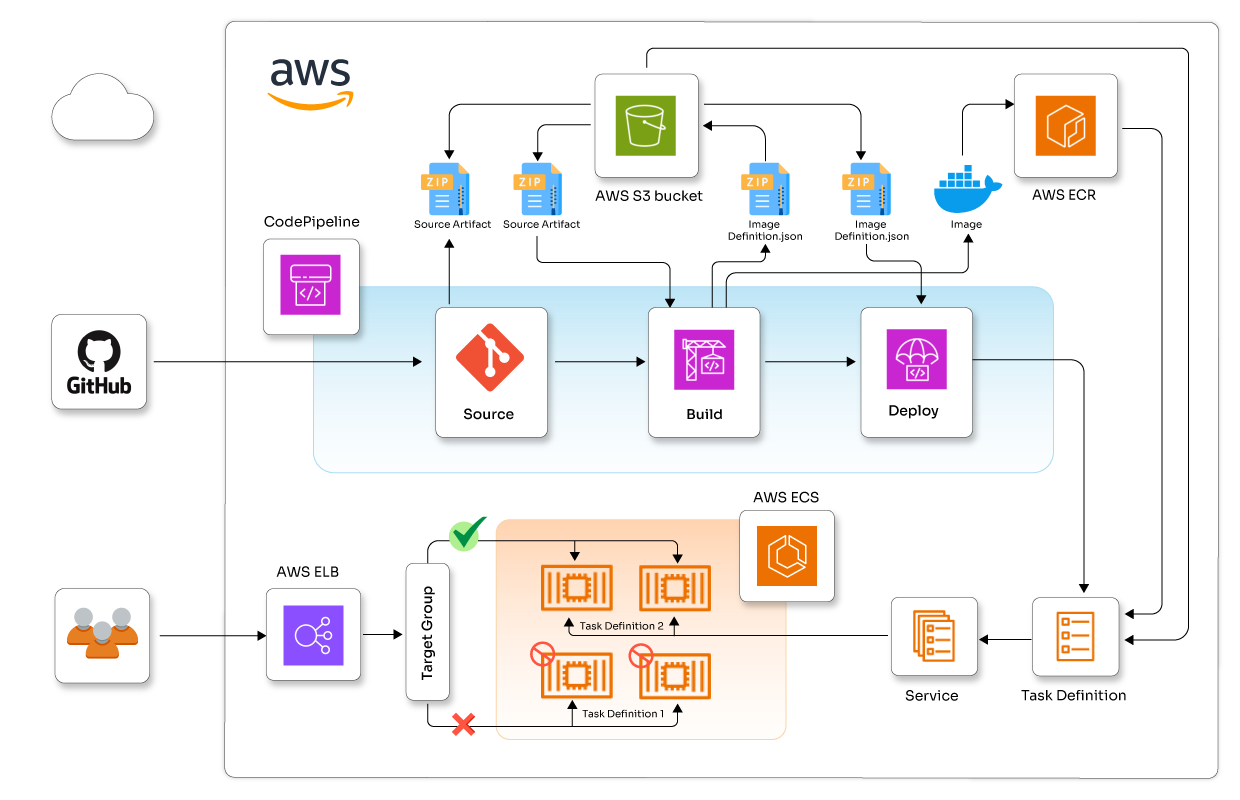
Amazon Elastic Container Service (ECS) offers an excellent platform for implementing blue-green deployments. By utilizing ECS along with other AWS services, you can establish a strong, automated deployment pipeline. In this blog, I'll guide you through the entire process of creating a blue-green deployment pipeline using Amazon ECS, from GitHub to production deployment.
Prerequisites of blue-green deployment with Amazon ECS
Before we begin, ensure you have the following:
- An AWS account with appropriate permissions
- AWS CLI installed and configured on your local machine
- Basic understanding of Docker and containerization
- Familiarity with Git for version control
- Private Subnet for CodeBuild with NAT Gateway attached.
- ECR repo if you don’t have, create a ECR repo using below command
aws ecr create-repository --repository-name ecs-demo-app --region us-east-1
Steps to implement blue-green deployment
Step 1: Create ECS cluster and Task Definition
aws ecs create-cluster --cluster-name ECS-BlueGreenCluster --region us-east-1
Before creating a task definition, you need to create an execution role and a task IAM role. Both roles need to be placed in the taskdef.json file. You can refer to the links below for instructions on creating these roles
- https://docs.aws.amazon.com/AmazonECS/latest/developerguide/task_execution_IAM_role.html
- https://docs.aws.amazon.com/AmazonECS/latest/developerguide/task-iam-roles.html
{
"family": "ecs-bg-task-def-v1",
"networkMode": "awsvpc",
"executionRoleArn": "arn:aws:iam:: <account-id>:role/ecsTaskExecutionRole-v1",
"taskRoleArn": "arn:aws:iam::<account-id>:role/ecsTaskRole",
"containerDefinitions": [
{
"name": "php-app",
"image": " <account-id>.dkr.ecr.us-east-1.amazonaws.com/ecs-demo-app:v1",
"essential": true,
"portMappings": [
{
"hostPort": 80,
"protocol": "tcp",
"containerPort": 80
}
]
}
],
"requiresCompatibilities": [
"FARGATE"
],
"cpu": "256",
"memory": "512"
}
Step 2: Register the task definition for ECS
aws ecs register-task-definition --cli-input-json file://taskdef.json
Step 3: Set up the code build for container image building
The first step in the blue-green deployment process is establishing a robust code pipeline. We will utilize AWS CodeBuild and CodePipeline to create an end-to-end CI/CD pipeline.
First, create a CodeBuild role to communicate with ECR and S3 bucket over CodePipeline. Refer to the official documentation for detailed instructions: https://docs.aws.amazon.com/codebuild/latest/userguide/setting-up-service-role.html
Next, set up a CodeBuild project to build the Docker image. Then, create a file named buildspec.yml in your repository root with the specified content.
version: 0.2

phases:
  pre_build:
    commands:
      - echo Logging in to Amazon ECR...
      - aws ecr get-login-password --region $AWS_REGION | docker login --username AWS --password-stdin $AWS_ACCOUNT_ID.dkr.ecr.$AWS_REGION.amazonaws.com
  build:
    commands:
      - echo Build started on `date`
      - echo Building the Docker image...
      - docker build -t $IMAGE_REPO_NAME:$IMAGE_TAG .
      - docker tag $IMAGE_REPO_NAME:$IMAGE_TAG $AWS_ACCOUNT_ID.dkr.ecr.$AWS_REGION.amazonaws.com/$IMAGE_REPO_NAME:$IMAGE_TAG
  post_build:
    commands:
      - echo Build completed on `date`
      - echo Pushing the Docker image...
      - docker push $AWS_ACCOUNT_ID.dkr.ecr.$AWS_REGION.amazonaws.com/$IMAGE_REPO_NAME:$IMAGE_TAG
      - REPOSITORY_URI=$(echo $AWS_ACCOUNT_ID.dkr.ecr.$AWS_REGION.amazonaws.com/$IMAGE_REPO_NAME:$IMAGE_TAG)
      - printf '{"ImageURI":"%s"}' $REPOSITORY_URI > imageDetail.json
      - cat imageDetail.json
      - echo Build completed on `date`

artifacts:
  files:
    - image*.json
    - 'appspec.yaml'
    - 'task-def.json'
  secondary-artifacts:
    DefinitionArtifact:
      files:
        - appspec.yaml
        - task-def.json
    ImageArtifact:
      files:
        - imageDetail.json
Step 4: Create a CodeBuild project:
aws codebuild create-project --cli-input-json file://codebuild-project.json
You'll need to create a codebuild-project.json file with the appropriate configuration. Here's a basic example:
{
  "name": "my-ecs-app-build",
  "source": {
    "type": "GITHUB",
    "location": "https://github.com/rajburnwal07/ecs-demo-php-simple-app.git",
    "buildspec": "buildspec.yaml",
    "gitCloneDepth": 1
  },
  "sourceVersion": "master",
  "artifacts": {
    "type": "NO_ARTIFACTS"
  },
  "environment": {
    "type": "LINUX_CONTAINER",
    "image": "aws/codebuild/amazonlinux2-x86_64-standard:3.0",
    "computeType": "BUILD_GENERAL1_SMALL",
    "privilegedMode": true,
    "environmentVariables": [
      {
        "name": "AWS_REGION",
        "value": "us-east-1"
      },
      {
        "name": "AWS_ACCOUNT_ID",
        "value": "<ACCOUNT-ID>"
      },
      {
        "name": "IMAGE_REPO_NAME",
        "value": "ecs-demo-app"
      },
      {
        "name": "IMAGE_TAG",
        "value": "v1"
      },
      {
        "name": "CONTAINER_NAME",
        "value": "php-app"
      }
    ]
  },
  "serviceRole": "arn:aws:iam::<account-id>:role/codebuild-service-role",
  "timeoutInMinutes": 60,
  "queuedTimeoutInMinutes": 480,
  "vpcConfig": {
    "securityGroupIds": [
      "sg-f699b1a8"
    ],
    "subnets": [
      "<private-subnet-natgw-attached>"
    ],
    "vpcId": "vpc-0f0a4c75"
  },
  "logsConfig": {
    "cloudWatchLogs": {
      "status": "ENABLED"
    },
    "s3Logs": {
      "status": "DISABLED",
      "encryptionDisabled": false
    }
  }
}
Step 5: Set up a VPC and subnets for your ECS services.
You can use an existing VPC or create a new one.
Create the application load balancer for switching the traffic from blue application target to green during deployment. Use these listeners and target group in ECS service.
vpc_id=$(aws ec2 create-vpc --cidr-block 10.0.0.0/16 --query 'Vpc.VpcId' --output text)
aws ec2 create-tags --resources $vpc_id --tags Key=Name,Value=my-ecs-vpc

subnet1_id=$(aws ec2 create-subnet --vpc-id $vpc_id --cidr-block 10.0.1.0/24 --availability-zone us-west-2a --query 'Subnet.SubnetId' --output text)
subnet2_id=$(aws ec2 create-subnet --vpc-id $vpc_id --cidr-block 10.0.2.0/24 --availability-zone us-west-2b --query 'Subnet.SubnetId' --output text)
Implementing blue-green deployment first, let's create an application Load Balancer:
alb_arn=$(aws elbv2 create-load-balancer \
--name my-ecs-alb \
--subnets $subnet1_id $subnet2_id \
--security-groups $security_group_id \
--query 'LoadBalancers[0].LoadBalancerArn' \
--output text)

blue_tg_arn=$(aws elbv2 create-target-group \
--name blue-tg \
--protocol HTTP \
--port 80 \
--vpc-id $vpc_id \
--target-type ip \
--query 'TargetGroups[0].TargetGroupArn' \
--output text)

green_tg_arn=$(aws elbv2 create-target-group \
--name green-tg \
--protocol HTTP \
--port 80 \
--vpc-id $vpc_id \
--target-type ip \
--query 'TargetGroups[0].TargetGroupArn' \
--output text)

aws elbv2 create-listener \
--load-balancer-arn $alb_arn \
--protocol HTTP \
--port 80 \
--default-actions Type=forward,TargetGroupArn=$blue_tg_arn


aws ecs create-service  --cluster ECS-BlueGreenCluster  --service-name myBGService --task-definition ecs-bg-task-def-v1   --load-balancers "targetGroupArn=$blue_tg_arn,containerName=php-app,containerPort=80" --desired-count 1  --launch-type EC2  --deployment-controller type=CODE_DEPLOY --network-configuration "awsvpcConfiguration={subnets=[$subnet1_id,$subnet2_id],securityGroups=[sg-068ad7fba9fae082b],assignPublicIp=ENABLED}" --launch-type FARGATE --region us-east-1
Step 6: Set up the code deploy
aws deploy create-application --application-name MyCodeDeployApp --compute-platform ECS

aws deploy create-deployment-group --cli-input-json file://create-deployment-group.json
Create create-deployment-group.json
{
  "application": {
    "applicationName": "my-ecs-deploy",
    "computePlatform": "ECS"
  },
  "deploymentGroup": {
    "applicationName": "my-ecs-deploy",
    "deploymentGroupName": "my-ecs-dg",
    "deploymentConfigName": "CodeDeployDefault.ECSAllAtOnce",
    "serviceRoleArn": "arn:aws:iam::YOUR_ACCOUNT_ID:role/ecsCodeDeployRole",
    "deploymentStyle": {
      "deploymentType": "BLUE_GREEN",
      "deploymentOption": "WITH_TRAFFIC_CONTROL"
    },
    "blueGreenDeploymentConfiguration": {
      "terminateBlueInstancesOnDeploymentSuccess": {
        "action": "TERMINATE",
        "terminationWaitTimeInMinutes": 5
      },
      "deploymentReadyOption": {
        "actionOnTimeout": "CONTINUE_DEPLOYMENT",
        "waitTimeInMinutes": 0
      }
    },
    "ecsServices": [
      {
        "serviceName": "myBGService",
        "clusterName": "ECS-BlueGreenCluster"
      }
    ],
    "loadBalancerInfo": {
      "targetGroupPairInfoList": [
        {
          "targetGroups": [
            {
              "name": "blue-tg"
            },
            {
              "name": "green-tg"
            }
          ],
          "prodTrafficRoute": {
            "listenerArns": [
              "<arn:aws:elasticloadbalancing:YOUR_REGION:YOUR_ACCOUNT_ID:listener/app/your-alb-name/your-alb-id/your-listener-id>"
            ]
          }
        }
      ]
    },
    "autoRollbackConfiguration": {
      "enabled": true,
      "events": ["DEPLOYMENT_FAILURE"]
    }
  }
}
Create a file named appspec.yml in your repository root with the following content:
version: 0.0
Resources:
- TargetService:
Type: AWS::ECS::Service
Properties:
TaskDefinition: <TASK_DEFINITION>
LoadBalancerInfo:
ContainerName: php-app # copy from task definition under containerDefinitions.name
ContainerPort: 80 # an application container port
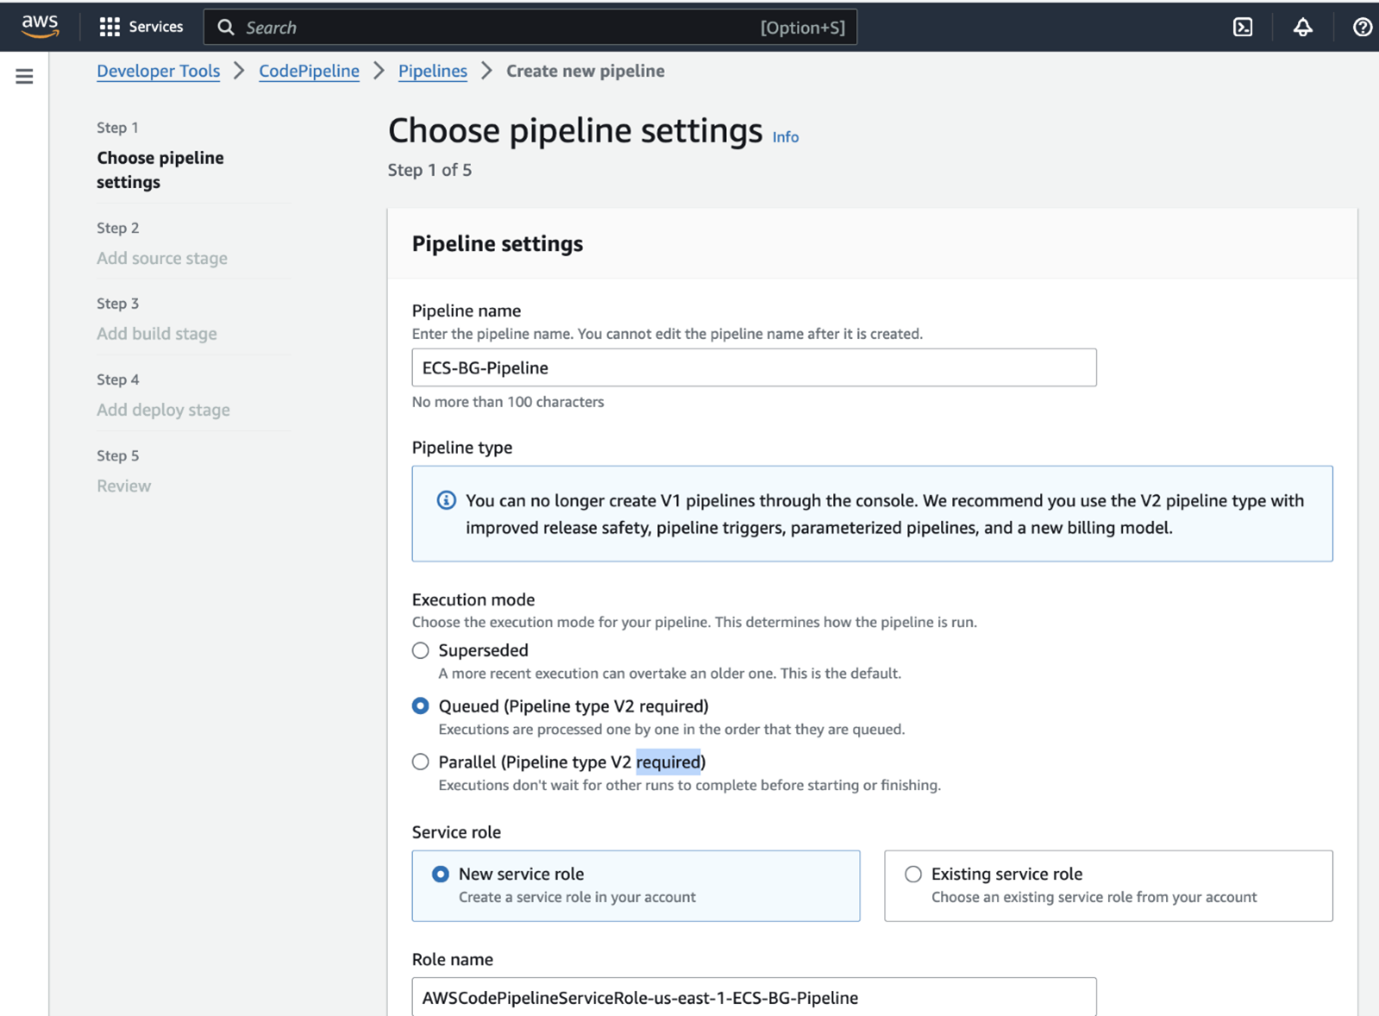
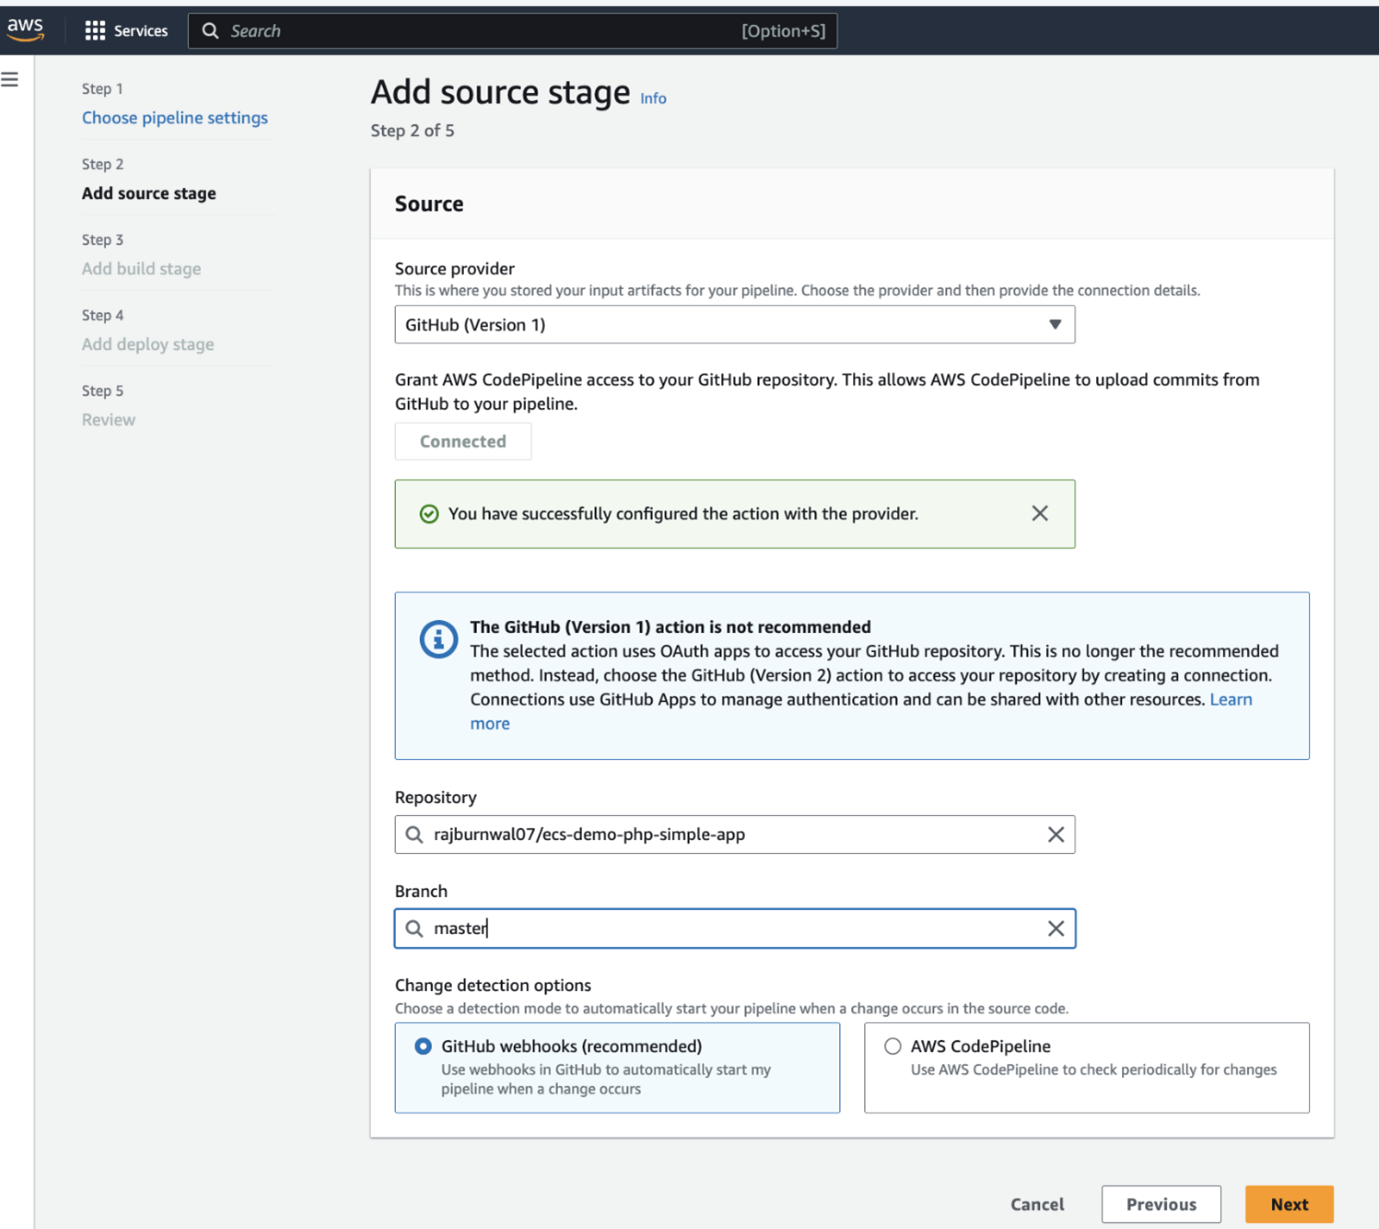
Step 7: Set up the code pipeline
Finally, let's set up CodePipeline to automate the entire process: We will use already created codebuild and ECS service, ELB, TargetGroups and Listener into CodePipeline.This sets up a basic pipeline that will pull code from Github, build a Docker image using CodeBuild, and push it to ECR. In the next sections, we'll add deployment stages to this pipeline. It typically includes stages like source, build and deploy to ECS.

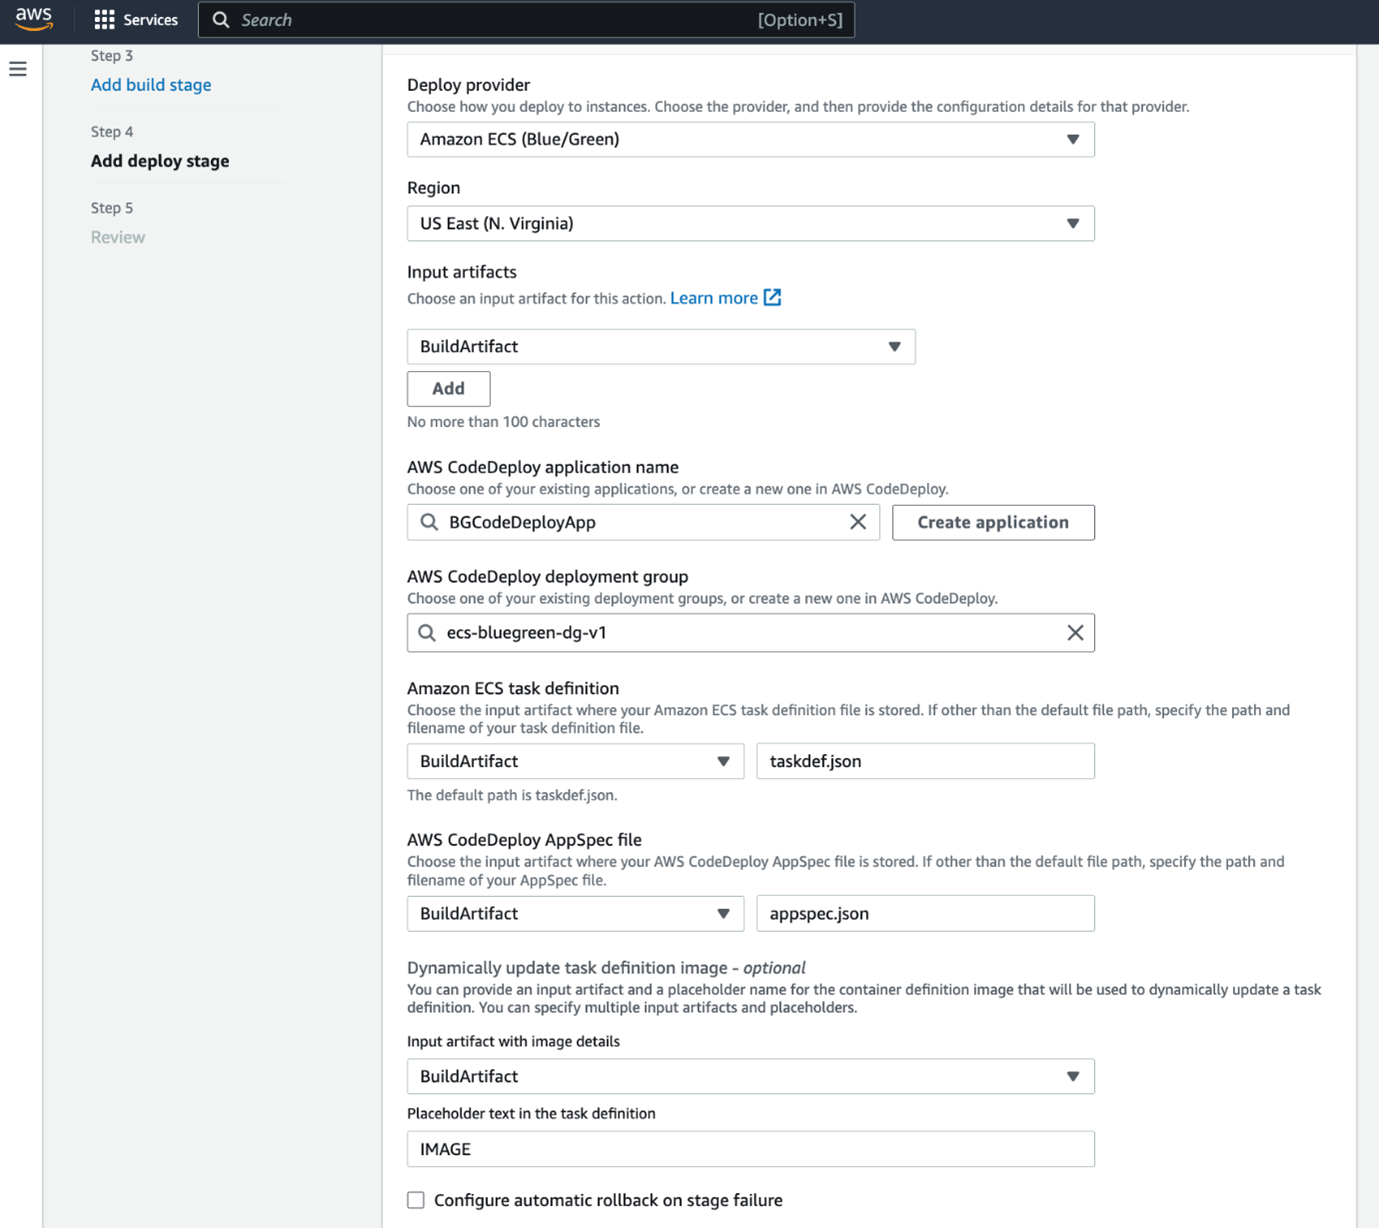
Automating blue-green deployment
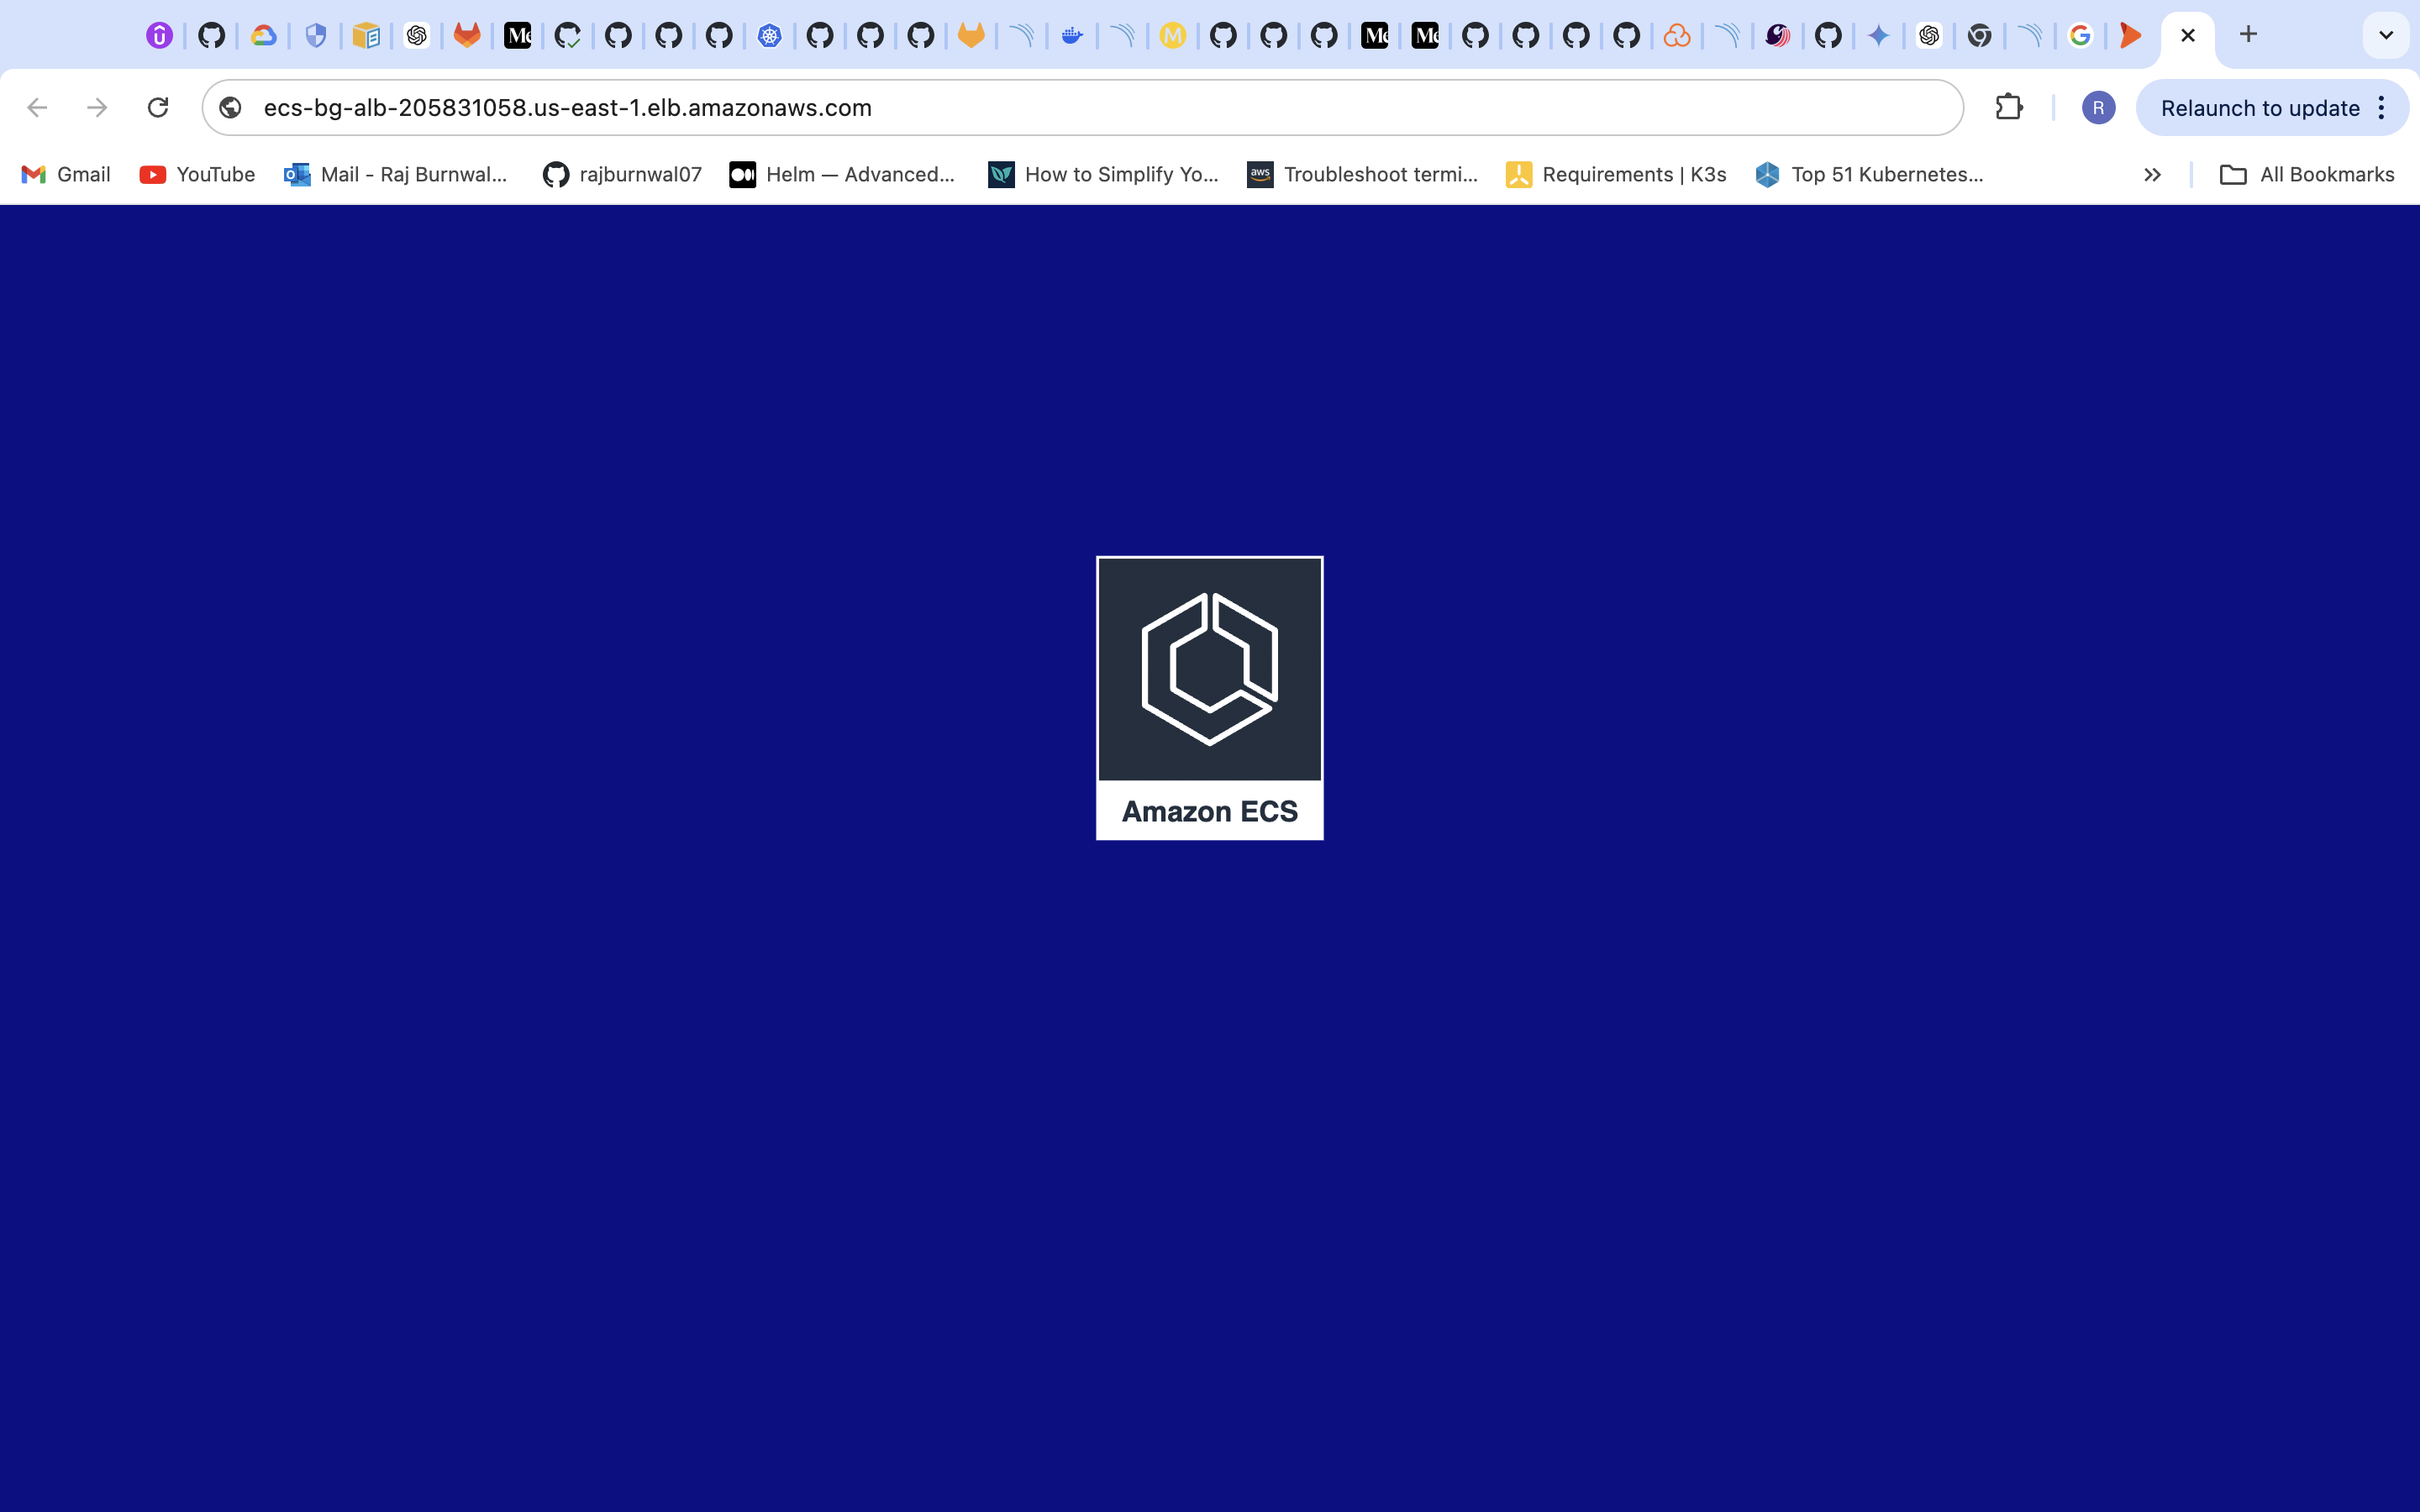
When you open the LoadBalancer endpoint of ECS service, the index page will look blue like shown below:
aws elbv2 describe-load-balancers -names ECSBGLoadBalancer --query \ 'LoadBalancers[*].DNSName' --output text
To test the deployment:
- Make changes to your application code. I have changed the background-color of index.html from blue to green.
- Commit and push the changes to your GitHub repo.
- Monitor the CodePipeline console to observe the pipeline in action.
- Verify that the new version is deployed to the green environment and Check that traffic is correctly routed to the new version.
Then access load balancer endpoint to verify new changes.
Also, you can rollback to blue deployment from codedeploy console if anything goes wrong after verifying.
Best practices and considerations for blue-green deployment
- Database migration: For applications with databases, consider using a schema migration tool like Flyway or Liquibase.
- Stateful applications: Use Amazon EFS or other persistent storage solutions for stateful applications.
- Cost optimization: Use auto scaling to adjust the number of tasks based on demand.
- Security: Implement VPC endpoints for private communication between services.
Blue-green deployment with Amazon ECS offers a robust way to update applications with minimal downtime and risk. By leveraging AWS services such as CodePipeline, CodeDeploy, and ECS, you can create a fully automated deployment pipeline that ensures smooth and reliable updates to your containerized applications.
As you become more accustomed to the blue-green deployment process, you can customize and optimize it to suit your needs. Always test thoroughly in a staging environment before implementing changes in production, and monitor your deployments closely to ensure they are functioning as expected. I have purposely written a thorough blog to guide you through the entire process of blue-green deployment. I hope you will find this useful. Happy Deployment!


Related Blogs