


Posted By

Blog 3/3 of our Web3 tri-series is here. If you missed the previous articles, be sure to check out Web3: The Future of the internet and how to build on it and A step-by-step guide for smart contract deployment using Hardhat. After exploring the fundamentals of Web3 and learning how to deploy smart contracts, it's time to put these concepts into practice by building a complete decentralized application. In this blog, we'll create something practical and impactful - a crypto donation platform.
Imagine a world where sending and receiving crypto donations is as easy as sharing a link. No intermediaries, no fuss—just seamless, decentralized transactions powered by blockchain technology. That’s exactly what I’ll guide you to build - a Web3-powered donation platform that lets users connect their MetaMask wallet, generate a unique donation link, and receive crypto directly from supporters with just a few clicks. I’ll share key features, code snippets, tips, and steps to help you build your own Web3 application.
Key features of the Web3 donation platform
- Wallet connection: Enable users to connect their MetaMask wallet effortlessly, integrating seamlessly with the Ethereum ecosystem.
Think of it as a digital handshake between your app and the blockchain. - Unique donation link: Generate personalized URLs containing the recipient’s wallet address, making it easy to share and receive crypto donations.
It’s like Venmo, but for crypto. - Donation form: Allow donors to add their name and a message, creating a more personal and meaningful donation experience.
Because who doesn’t love a heartfelt note with their crypto? - Crypto transactions: Trigger MetaMask for authentication and transaction confirmation, ensuring fast and secure payments.
Ditch clunky payment gateways and embrace decentralized magic. - Smart contract integration: Build and deploy a Solidity smart contract using Hardhat to handle transactions transparently on the blockchain.
Think of it as the brain of the operation—transparent, and tamper-proof.
Tech stack
- Frontend: React with Vite
- Blockchain interaction: Ethers.js
- Smart contract: Solidity and Hardhat
- Wallet integration: MetaMask
Step-by-step Web3 donation app development process, with code snippets
Setup the project with React and Vite. Use Vite as the build tool because of its fast development environment and efficient Hot Module Replacement (HMR). Use the following commands to create the project:
npm create vite@latest web3-app --template react
cd web3-app
npm install
To install ethers.js for interacting with the blockchain:
npm install ethers
Note: The smart contract for this application was created using Solidity and deployed using Hardhat.
Landing page and connecting to MetaMask
The landing page of the application provides users with a brief introduction to its functionality.
Users can then click on the Connect Your Wallet button, allowing them to log in using MetaMask and generate a unique transaction link.
To enable user authentication and blockchain transactions, we need to connect MetaMask with ethers.js. Below is the function to initialize the provider and signer:
import { ethers } from "ethers";
import { useNavigate } from "react-router-dom";
import useStorage from "../hooks/useStorage.tsx";

const Login = () => {
  const { setAddress } = useStorage();
  const navigate = useNavigate();

  const initializeProvider = async () => {
    let signer;
    let provider;

    if ((window as any).ethereum == null) {
      console.log("MetaMask not installed; using read-only defaults");
      provider = ethers.getDefaultProvider();
    } else {
      provider = new ethers.BrowserProvider((window as any).ethereum);
      signer = await provider.getSigner();
      setAddress(signer.address);
      navigate("/generate-link");
    }
  };
  return (
    <div>
      <div className="flex flex-col items-center">
        <h2 className="text-4xl m-4 font-bold text-white">
          CryptoBrew - DApp
      </h2>
        <p className="text-white text-justify my-4">
          CryptoBrew is a decentralized application (dApp) built using Web3
          concepts, enabling users to support creators with simple payments. By using Ethereum smart contracts, CafeBrew allows creators to generate a unique payment link, making it easy for supporters to send secure and transparent microtransactions directly to the creator’s wallet.
        </p>
        <button
          type="button"
          onClick={() => initializeProvider()}
          className="w-full py-3 bg-[#EED8BF] text-black font-semibold rounded-md cursor-pointer focus:outline-none "
        >
          Connect Your Wallet
        </button>
      </div>
    </div>
  );
};

export default Login;
How it works:
- Checks if MetaMask is installed.
- If not installed, uses a default provider.
- If installed, connects to the MetaMask wallet and retrieves the user's address.
- Redirects the user to the next page to generate a transaction link.

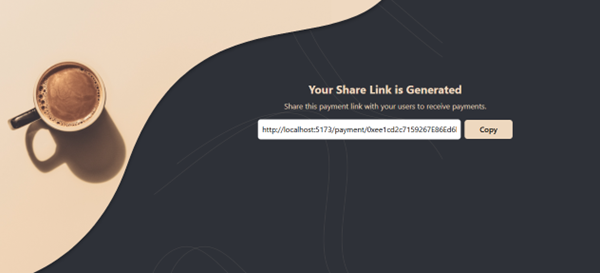
Generating and sharing the donation link
Once the user successfully connects their wallet, they are redirected to a new page where a unique URL is generated. This URL embeds their wallet address, allowing them to easily share it for receiving donations.
import { useState, useCallback, useEffect } from "react";
import useStorage from "../hooks/useStorage.tsx";

const GenerateLink = () => {
  const [copied, setCopied] = useState(false);
  const { getAddress } = useStorage();
  const paymentUrl = `${import.meta.env.VITE_BASE_URL}/payment/${getAddress()}`;

  const handleCopy = useCallback(() => {
    navigator.clipboard.writeText(paymentUrl);
    setCopied(true);
  }, [paymentUrl]);

  useEffect(() => {
    if (copied) {
      const timer = setTimeout(() => setCopied(false), 2000);
      return () => clearTimeout(timer);
    }
  }, [copied]);

  return (
    <div className="text-center text-[#EED8BF]">
      <h2 className="text-2xl font-bold mb-2">Your Share Link is Generated</h2>
      <p className="mb-2">Share this payment link with your users to receive payments.</p>
      <div className="flex justify-center items-center p-2 rounded-md">
        <input
          type="text"
          value={paymentUrl}
          readOnly
          className="w-full p-2 border border-transparent focus:outline-none rounded-md mr-2 bg-white"
        />
        <button
          onClick={handleCopy}
          className="px-4 py-2 bg-[#EED8BF] w-30 rounded-md font-semibold cursor-pointer focus:outline-none"
        >
          Copy
        </button>
      </div>
      {copied && <p className="text-white text-end">Copied to clipboard</p>}
    </div>
  );
};

export default GenerateLink;
Users can copy this link and share it on their blog, website, or social media.
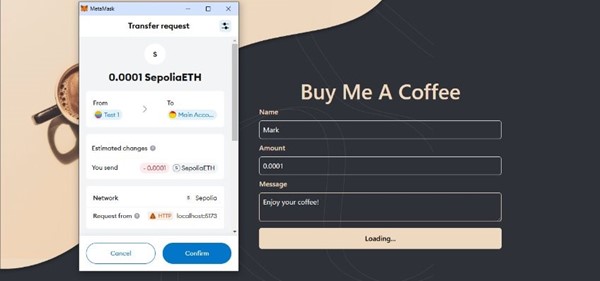
Donation form and transaction processing
When a donor clicks the shared link, they are presented with a form to enter:
- Sender’s name
- Custom message
- Cryptocurrency amount to send
The following function handles the transaction:
import { useState } from "react";
import { ethers } from "ethers";
import { useParams, useNavigate } from "react-router-dom";
import abi from "../utils/BuyMeACoffee.json";

const PaymentForm = () => {
  const [name, setName] = useState("God");
  const [message, setMessage] = useState("Thanks for coffee");
  const [amount, setAmount] = useState("0.0001"); // Default amount
  const [loading, setLoading] = useState(false);
  const { id } = useParams();
  const navigate = useNavigate();

  const defaultContractAddress = id || "xxxxxxxxxxxxxxxxxxxxxxxxxxxxxxxx8334";
  const contractABI = abi.abi;

  const handleSubmit = async (e: React.FormEvent<HTMLFormElement>) => {
    e.preventDefault();
    try {
      if ((window as any).ethereum) {
        const provider = new ethers.BrowserProvider(
          (window as any).ethereum,
          "any"
        );
        const signer = await provider.getSigner();
        const contract = new ethers.Contract(
          id ? id : defaultContractAddress,
          contractABI,
          signer
        );
        setLoading(true);
        const transaction = await contract.buyCoffee(name, message, {
          value: ethers.parseEther(amount)
        });

        await transaction.wait();
        navigate("/thank-you");
      }
    } catch (e) {
      console.error("Transaction failed:", e);
    } finally {
      setLoading(false);
    }
  };

  return (
    <form onSubmit={handleSubmit}>
      <div className="flex align-center justify-center mb-4">
        <h2 className="text-5xl flex justify-center items-center font-semibold text-[#EED8BF]  ">
          Buy Me A Coffee
        </h2>
      </div>

      {/* Name Input */}
      <div className="mb-4">
        <label htmlFor="name" className="block text-[#EED8BF] font-medium mb-2">
          Name
        </label>
        <input
          type="text"
          id="name"
          value={name}
          onChange={(e) => setName(e.target.value)}
          className="w-full p-2 text-white border border-gray-300 rounded-md focus:outline-none "
          required
        />
      </div>

      {/* Message Input */}
      <div className="mb-4">
        <label
          htmlFor="message"
          className="block  text-[#EED8BF] font-medium mb-2"
        >
          Message
        </label>
        <textarea
          id="message"
          value={message}
          onChange={(e) => setMessage(e.target.value)}
          className="w-full p-2 text-white border border-[#EED8BF] rounded-md focus:outline-none  focus:ring-blue-50"
          required
        ></textarea>
      </div>

      {/* Amount Input */}
      <div className="mb-4">
        <label htmlFor="amount" className="block font-medium mb-2">
          Amount (ETH)
        </label>
        <input
          type="number"
          id="amount"
          value={amount}
          onChange={(e) => setAmount(e.target.value)}
          min="0.0001"
          step="0.0001"
          className="w-full p-2 text-white border border-gray-300 rounded-md focus:outline-none"
          required
        />
      </div>

      {/* Submit Button */}
      <button
        type="submit"
        className="w-full py-3 bg-[#EED8BF] text-black font-semibold rounded-md cursor-pointer focus:outline-none "
      >
        {loading ? "Processing..." : " Buy A Coffee"}
      </button>
    </form>
  );
};

export default PaymentForm;
Testing the application
Since the application runs on the local machine, you can test the functionality with the following steps:
- Connect to MetaMask wallet.
- Generate a transaction link and open it in another browser window.
- Enter sender details and sent a test transaction.
- Verify the transaction on Etherscan with these below steps.
- To verify the transaction, check the meta mask transition history.
- Clicking on a transaction in the history will typically open a link to Etherscan, where you can view detailed information about the transaction (e.g., block confirmation, gas used, etc.).
Final thoughts
This project showcases a Web3 application where a traditional frontend seamlessly interacts with decentralized technologies. While it uses centralized hosting for accessibility, blockchain handles transactions, ensuring transparency and security in a decentralized environment.
I hope this guide helps you understand the key components of a Web3 app! Feel free to experiment and enhance the project by integrating additional blockchain features. If you encounter any challenges or seek expert guidance, our team is ready to assist. Contact us today to connect with a Web3 specialist and turn your innovative ideas into reality.


