Pulumi - simplifying Infrastructure as Code

Posted By
Yograj Shisode

Managing IT infrastructure at the pace of ever-evolving tech. Especially if you plan to do it manually, my advice would be "brace yourselves." Advancements in Cloud, Agile, and DevOps practices have revolutionized designing, developing, and maintaining the IT infrastructure with Cloud Automation services. Pulumi Infrastructure as Code (IaC) is one of the critical components of these practices. IaC manages your IT infrastructure using configuration files and provides benefits such as enhanced speed, efficiency, and consistency.
Pulumi IaC facilitates faster infrastructure deployments as teams don't have to maintain the settings of individual deployment environments. There are several IaC solutions available in the market. Terraform is the current industry leader in IaC. It is a fantastic tool; however, you must be fluent in Terraform's Domain-Specific Language like HashiCorp Configuration Language (HCL). Pulumi, an open-source IaC tool, is used to configure, deploy, and maintain cloud resources. The interesting thing about Pulumi is it supports languages such as Python, JavaScript, TypeScript, Go, and .NET. You can develop reusable functions, packages, classes, and Pulumi components with these languages. Pulumi also supports a superset of the providers that Terraform currently offers.
Let's see what Pulumi has in store for us when it comes to IaC.
Pulumi
Pulumi is an Infrastructure as Code platform that allows you to use familiar programming languages and tools to build, deploy, and manage cloud infrastructure.
You can create, deploy and manage infrastructure as code on any cloud. Pulumi offers a desired state IaC model where the code represents the desired infrastructure state. The deployment engine compares this desired state with the stack's current state to determine what resources need to be created, updated, or deleted. Pulumi supports all the leading cloud providers, including AWS, Azure, Google Cloud, and other services like CloudFlare and Digital Ocean.
Pulumi Stack, State, and Backend
Pulumi stores metadata about your infrastructure to manage cloud resources, known as the state. Each Pulumi stack has its state that allows Pulumi infrastructure automation to understand when and how to create, read, delete, or update cloud resources. The Pulumi program is usually deployed to a stack, an isolated, independently configurable instance of a Pulumi program. More precisely, the stack represents different phases of development or feature branches.
A backend is an API and storage endpoint that allows the CLI to coordinate updates and read & write stack states whenever required. The state can be stored in a backend of your preference. Pulumi Service is an easy-to-use, secure, and reliable hosted application having policies and safeguards. It facilitates team collaboration and supports simple object storage in AWS S3, Google Cloud Storage, Microsoft Azure Blob Storage, and any AWS S3 compatible server like Minio or Ceph or a local filesystem.
By default, you can use hosted Pulumi service that takes care of state and backend settings. If you use cloud storage or a local file system as a backend, you can choose your state's location. However, in this scenario, you have to take care of the security, state management, auditing. Pulumi does not store cloud credentials; it only stores configuration and secrets. Encryption providers can help you do the job of encrypting these secrets. Learn more about secrets and configurations in the Pulumi Concepts documentation on managing sensitive data effectively.
Pulumi Backends
Pulumi supports two classes of backends for storing your infrastructure state viz., service and self-managed.
- Service: This includes managed cloud experience using the online or self-hosted Pulumi Service application.
-
Logging Into the Pulumi Service Backend: The basic form of login will use the Pulumi Service by default.
pulumi login
-
Logging Into a Self-Hosted Pulumi Service Backend: If you wish to log in to a specific self-hosted backend, pass the backend-specific URL as the sole argument. Alternatively, you may set the PULUMI_BACKEND_URL environment variable.
pulumi login <backend-url>
-
- Self-Managed: This includes manually managed object store, including AWS S3, Azure Blob Storage, Google Cloud Storage, any AWS S3 compatible server such as Minio or Ceph, or your local filesystem. State management, including backup, sharing, and team access synchronization, is custom and implemented manually for self-managed backends. To use a self-managed backend, specify a storage endpoint URL as Pulumi login's <backend-url> argument.
-
AWS S3
pulumi login s3://<bucket-path>
-
Azure Blob
pulumi login azblob://<container-path>
-
Google Cloud Storage
pulumi login gs://<bucket-path>
-
Local storage
pulumi login –local OR
pulumi login file://<fs-path>
-
Let me explain Pulumi in detail with a simple Pulumi program.
Pulumi AWS Example (Python):
Let's write one simple example to create a VPC and a few subnets on AWS.
1. Pulumi Installation
You have to set up your environment by installing Pulumi, your preferred language runtime, and configuring your AWS credentials.
- To install the Pulumi on MacOS, run the following command:
brew install pulumi
- To install the Pulumi on Linux, run the following command:
curl -fsSL https://get.pulumi.com | sh
2. Pulumi requires cloud credentials to manage and provision resources. You must use an IAM user account with programmatic access with rights to deploy and manage resources handled through Pulumi. You can set the credentials for AWS cloud either using AWS CLI or by exporting them in OS environment variables.
Use the following command to set the credentials using AWS CLI:
aws configure
Set the credentials in OS environment by executing commands:
export AWS_ACCESS_KEY_ID=<YOUR_ACCESS_KEY_ID>
export AWS_SECRET_ACCESS_KEY=<YOUR_SECRET_ACCESS_KEY>
Once you complete the installation, you need to create a Pulumi project.
3. Pulumi project creation
Now, create a new empty directory for the Pulumi project. In the new empty directory, run the following command:
pulumi new aws-python
This command will ask for project name, project description, stack name, AWS region name. It will start the installation for required dependent python libraries. Once installed, you can see the files, including Pulumi.<stack_name>.yaml, Pulumi.yaml, __main__.py , requirements.txt, and venv directory.
Let’s try to understand these files:
- Pulumi.yaml: The pulumi.yaml project file specifies your project's metadata.
Example:
name: pulumi_aws_test
runtime:
	name: python
	options:
		virtualenv: ../pulumi_aws/venv
description: A minimal AWS Python Pulumi program
Here, the name denotes the Pulumi project name. The runtime has the information, including the runtime programming environment name - python/typescript/javascript/C#. You can specify the path for the python virtual environment as virtualenv.
A Pulumi project is any folder that contains a Pulumi.yaml file. Project file must initiate with a capitalized P, or either .yml or .yaml extension. The closest enclosing folder with a Pulumi.yaml file in a subfolder determines the current project. A new project can be created with pulumi new.
- Requirements.txt: Contains the list of required packages to run the current Pulumi project.
- venv: venv directory is the default python virtualenv configured in Pulumi.yaml. Pulumi uses this directory internally to run the project. You can configure your python virtualvenv by changing virtualenv in Pulumi.yaml.
- __main__.py: We can write Pulumi code for our infrastructure in __manin__.py file. This one is the entry point to run the Pulumi project.
- Pulumi.<stack_name>.yaml: This YAML file contains the configuration for the environment.
Now, replace the following code snippet in __main__.py. This code will create a VPC and subnets on the AWS cloud.
"""An AWS Python Pulumi
program"""                                                                                              import pulumi
import json
from pulumi_aws import ec2

# Get stack config
config = pulumi.Config()

# Get VPC config from stack
name = config.get("vpc_name")
cidr_block = config.get("vpc_cidr_block")
enable_dns_support = config.get("enable_dns_support")
enable_dns_hostnames = config.get("enable_dns_hostnames")
tags = json.loads(config.get("tags"))

# Create VPC
vpc = ec2.Vpc(name, cidr_block=cidr_block,
enable_dns_hostnames=enable_dns_hostnames,
enable_dns_support=enable_dns_support,
              tags=tags)

# Get subnets config from stack
subnets = config.get("subnets")
subnets = json.loads(subnets)
subnets_out = []
for subnet in subnets:
    subnet_name = subnet["name"]
    subnet_cidr = subnet["cidr"]
    subnet_availability_zone = subnet["zone"]
    tags = json.loads(config.get("tags"))

    # Get VPC id
    vpc_id = vpc.id

    # Create subnet
    subnet_config = ec2.Subnet(subnet_name, assign_ipv6_address_on_creation=False, vpc_id=vpc_id,
                                   cidr_block=subnet_cidr, availability_zone=subnet_availability_zone,
                                   tags=tags)
    subnets_out.append(subnet_config)

pulumi.export('Subnet_Config', subnets_out)
pulumi.export('Vpc_Config', vpc)
You need to create the stack to run the above Pulumi Program. You can maintain a separate stack for different phases of development, such as development, staging, and production.
Let’s create a development stack:
pulumi stack init development
You can list the currently available stacks by running:
pulumi stack ls
You need to select development as an active stack before running Pulumi operations. Use the following command to select the stack:
pulumi stack select development
Now, you can set the config for the development stack using Pulumi config command:
pulumi config set aws:region us-east-1
pulumi config set vpc_name "Opcito_VPC"
pulumi config set vpc_cidr_block "10.0.0.0/24"
pulumi config set enable_dns_support false
pulumi config set enable_dns_hostnames false
pulumi config set --path 'tags.Created_by' Opcito
pulumi config set --path 'tags.Name' Opcito_VPC
pulumi config set --path 'subnets[0].name' opcito-subnet-1
pulumi config set --path 'subnets[0].cidr' 10.0.0.0/26
pulumi config set --path 'subnets[0].zone' us-east-1b
pulumi config set --path 'subnets[1].name' opcito-subnet-2
pulumi config set --path 'subnets[1].cidr' 10.0.0.64/26
pulumi config set --path 'subnets[1].zone' us-east-1a
pulumi config set --path 'subnets[0].tags.name' opcito-subnet-1
pulumi config set --path 'subnets[0].tags.Created by' Opcito
pulumi config set --path 'subnets[1].tags.name' opcito-subnet-2
pulumi config set --path 'subnets[1].tags.Created by' Opcito
If required, you can set AWS credentials in a stack as well. Please use –secret flag to encrypt any sensitive information while storing it in the stack.
pulumi config set aws:accessKey <AWS_ACCESS_KEY> --secret
pulumi config set aws:secretKey <AWS_SECRET_KEY> --secret
Now our stack is ready to create the AWS VPC and subnets. Instead of Pulumi config, you can also modify Pulumi.development.yaml directly as per the requirements.
Set PULUMI_CONFIG_PASSPHRASE in OS environment. This environment variable protects and unlocks your configuration values and secrets.
export PULUMI_CONFIG_PASSPHRASE=mysecretpassphrase
You can preview your changes explicitly before deploying by running the following command:
pulumi preview
You can preview and deploy the resources by running the command:
pulumi up
To delete a resource, run the following command:
pulumi destroy
You can reuse the same code for testing or staging environments by using a separate stack for each environment.
Pulumi automation SDK for Python
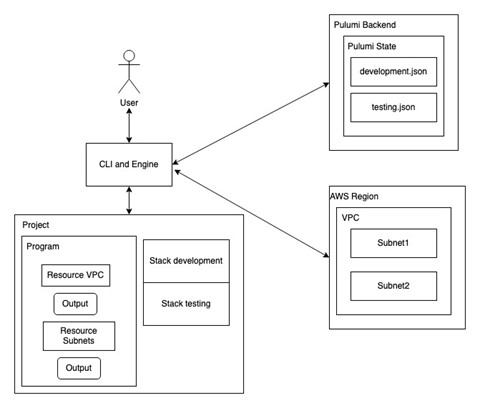
The Pulumi Automation API is a programmatic interface for running Pulumi programs without the Pulumi CLI. The automation API encapsulates the functionalities of the CLI such as pulumi up, pulumi preview, pulumi destroy, and pulumi stack init, but with more flexibility. Automation API allows you to embed Pulumi within your application code, making it easy to create custom experiences on top of Pulumi that are tailored to your use-case, domain, and team.
Let’s write one simple inline Pulumi program to create VPC and subnets using Pulumi Automation API/SDK.
-
Create file pulumi_vpc_subnet_example.py
import os import pulumi import json import argparse from pulumi_aws import ec2 from pulumi.automation import ConfigValue, create_or_select_stack, ConcurrentUpdateError def pulumi_inline_example(): print("Executing Pulumi inline function") # Get stack config config = pulumi.Config() # Get VPC config from stack name = config.get("vpc_name") cidr_block = config.get("vpc_cidr_block") enable_dns_support = config.get("enable_dns_support") enable_dns_hostnames = config.get("enable_dns_hostnames") tags = json.loads(config.get("tags")) # Create VPC vpc = ec2.Vpc(name, cidr_block=cidr_block, enable_dns_hostnames=enable_dns_hostnames, enable_dns_support=enable_dns_support, tags=tags) # Get subnets config from stack subnets = config.get("subnets") subnets = json.loads(subnets) subnets_out = [] for subnet in subnets: subnet_name = subnet["name"] subnet_cidr = subnet["cidr"] subnet_availability_zone = subnet["zone"] tags = json.loads(config.get("tags")) # Get VPC id vpc_id = vpc.id # Create subnet subnet_config = ec2.Subnet(subnet_name, assign_ipv6_address_on_creation=False, vpc_id=vpc_id, cidr_block=subnet_cidr, availability_zone=subnet_availability_zone, tags=tags) subnets_out.append(subnet_config) pulumi.export('Subnets_State', subnets_out) pulumi.export('VPC_State', vpc) def configure_stack(secret_key, access_key, region, vpc_subnet_config): print("Configuring stack") stack = create_or_select_stack("development", "pulumi_aws", program=pulumi_inline_example) print("Configuring cloud credentials") stack.set_config("aws:secretKey", ConfigValue(value=secret_key, secret=True)) stack.set_config("aws:accessKey", ConfigValue(value=access_key, secret=True)) stack.set_config("aws:region", ConfigValue(value=region)) for config_key, config_value in vpc_subnet_config.items(): print("Configuring stack for key %s with value %s" % (config_key, config_value)) if type(config_value) != str: config_value = json.dumps(config_value) stack.set_config(config_key, ConfigValue(value=config_value)) return stack def perform_operation(stack, delete=False): success = False try: if delete: print("Destroying resources for stack %s" % stack.name) resp = stack.destroy() else: print("Creating/Updating resources for stack %s" % stack.name) resp = stack.up() print("Response: %s" % resp) except ConcurrentUpdateError: print("Concurrent update error") except Exception as e: print("Failed while creating resources") if resp.summary.result == "succeeded": success = True return resp, success if __name__=="__main__": parser = argparse.ArgumentParser(description='') parser.add_argument('--delete', default=False, action="store_true", help="Delete Configuration") args = parser.parse_args() delete_config = args.delete secret_key = os.getenv("AWS_SECRET") access_key = os.getenv("AWS_ACCESS_KEY") region = os.getenv("AWS_REGION") with open("vpc_subnet_config.json", "r") as infra_config: vpc_subnet_config = json.load(infra_config) stack = configure_stack(secret_key, access_key, region, vpc_subnet_config) if delete_config: _, success = perform_operation(stack, delete=True) else: resp, success = perform_operation(stack) vpc_id = resp.outputs.get("VPC_State").value["id"] subnet_ids = [subnet["id"] for subnet in resp.outputs.get("Subnets_State").value] print("VPC ID: %s" % vpc_id) print("Subnets ID: %s" % subnet_ids) if success: print("Operation succeeded") else: print("Operation failed") -
Now, write a simple JSON file vpc_subnet_config.json for config as shown below:
    {
 "vpc_name": "opcito_vpc",
 "vpc_cidr_block": "10.0.0.0/24",
 "enable_dns_support": "false",
 "enable_dns_hostnames": "false",
 "tags": {
 "Created_by": "Opcito",
 "Name": "Opcito_VPC"
 },
 "subnets": [
 {
 "name": "Opcito-subnet-1",
 "cidr": "10.0.0.0/26",
 "zone": "us-east-1b",
 "tags": {
 "Name": "Opcito-subnet-1",
 "Created By": "Opcito"
 }
 },
 {
 "name": "Opcito-subnet-2",
 "cidr": "10.0.0.64/26",
 "zone": "us-east-1a",
 "tags": {
 "Name": "Opcito-subnet-2",
 "Created By": "Opcito"
 }
 }
 ]
}
To run the above program, make sure you have installed Pulumi.
-
Now, install the following pip packages:
pip install pulumi==3.20.0
pip install pulumi-aws==4.33.0
-
Set the required AWS credentials in OS environment variable as below:
export AWS_SECRET=””
export AWS_ACCESS_KEY=””
export AWS_REGION="us-east-1"
Now to create the resources just run
Python3 pulumi_vpc_subnet_example.py
To delete the resources, we can run
Python3 pulumi_vpc_subnet_example.py --delete
This is it; your AWS infrastructure with required VPC and subnets is all set and ready.
Pulumi is a modern Pulumi IaC tool. Familiar programming languages, Automation API, options to maintain state files on a local file system or Pulumi services, or more reliable storing options like Amazon S3 and Azure Blob Storage make it more practical and effortless. Contact our Pulumi experts at our contact page to elevate your Pulumi cloud infrastructure management! Let us know about your infrastructure codification experience with Pulumi in the comments section. Happy Coding!
Related Blogs


