All about AWS Inspector-2 for EC2 and how to intentionally generate Inspector-2 findings

Posted By
Rohini Nagane

Worried about vulnerabilities lurking in your EC2 instances? Fear not! This blog dives deep into AWS Inspector 2, a powerful tool for continuously scanning your EC2 environment, helping you identify and address security risks proactively. Learn how Inspector 2 works, the types of findings it generates, and even how to intentionally trigger findings for testing purposes!
What is AWS Inspector – an introduction
In the ever-growing threat landscape, ensuring the security of data within an organization's AWS (Amazon Web Services) environment is crucial. Amazon offers various security services to bolster protection. Among them is the Amazon Inspector service. This service plays a significant role in continuously scanning resources within AWS for package vulnerabilities and network exposure. By identifying vulnerabilities introduced by software packages, Inspector enables proactive measures to develop applications with adherence to best practices and policies. When a vulnerability or network exposure is detected, Inspector generates an event, commonly referred to as a finding, containing all pertinent information about the affected resources and the remediation required. The service supports scanning for EC2, ECR, and Lambda function resources. For pricing details, refer to the AWS Inspector Pricing page.
Types of findings:
Two major types of findings are supported by the Inspector:
- Package Vulnerability
- Network Reachability
Finding 1 - Package Vulnerability:
- This type of findings identify software packages in your AWS environment that are exposed to Common Vulnerabilities and Exposures (CVEs).
- EC2 are virtual machines in AWS environments on which a user can install different software packages, helper libraries,etc and it can also have existing support files.
- The Inspector helps in scanning these packages and find out if there are any vulnerabilities in versions of packages that are installed or the way that software is configured etc.
Prerequisites:
- For an inspector to scan your EC2 instance for vulnerabilities, it is mandatory that the system manager manages the EC2 instance.
- Another prerequisite is you need to enable the Inspector. Follow this document to enable Inspector - Activate Amazon Inspector.
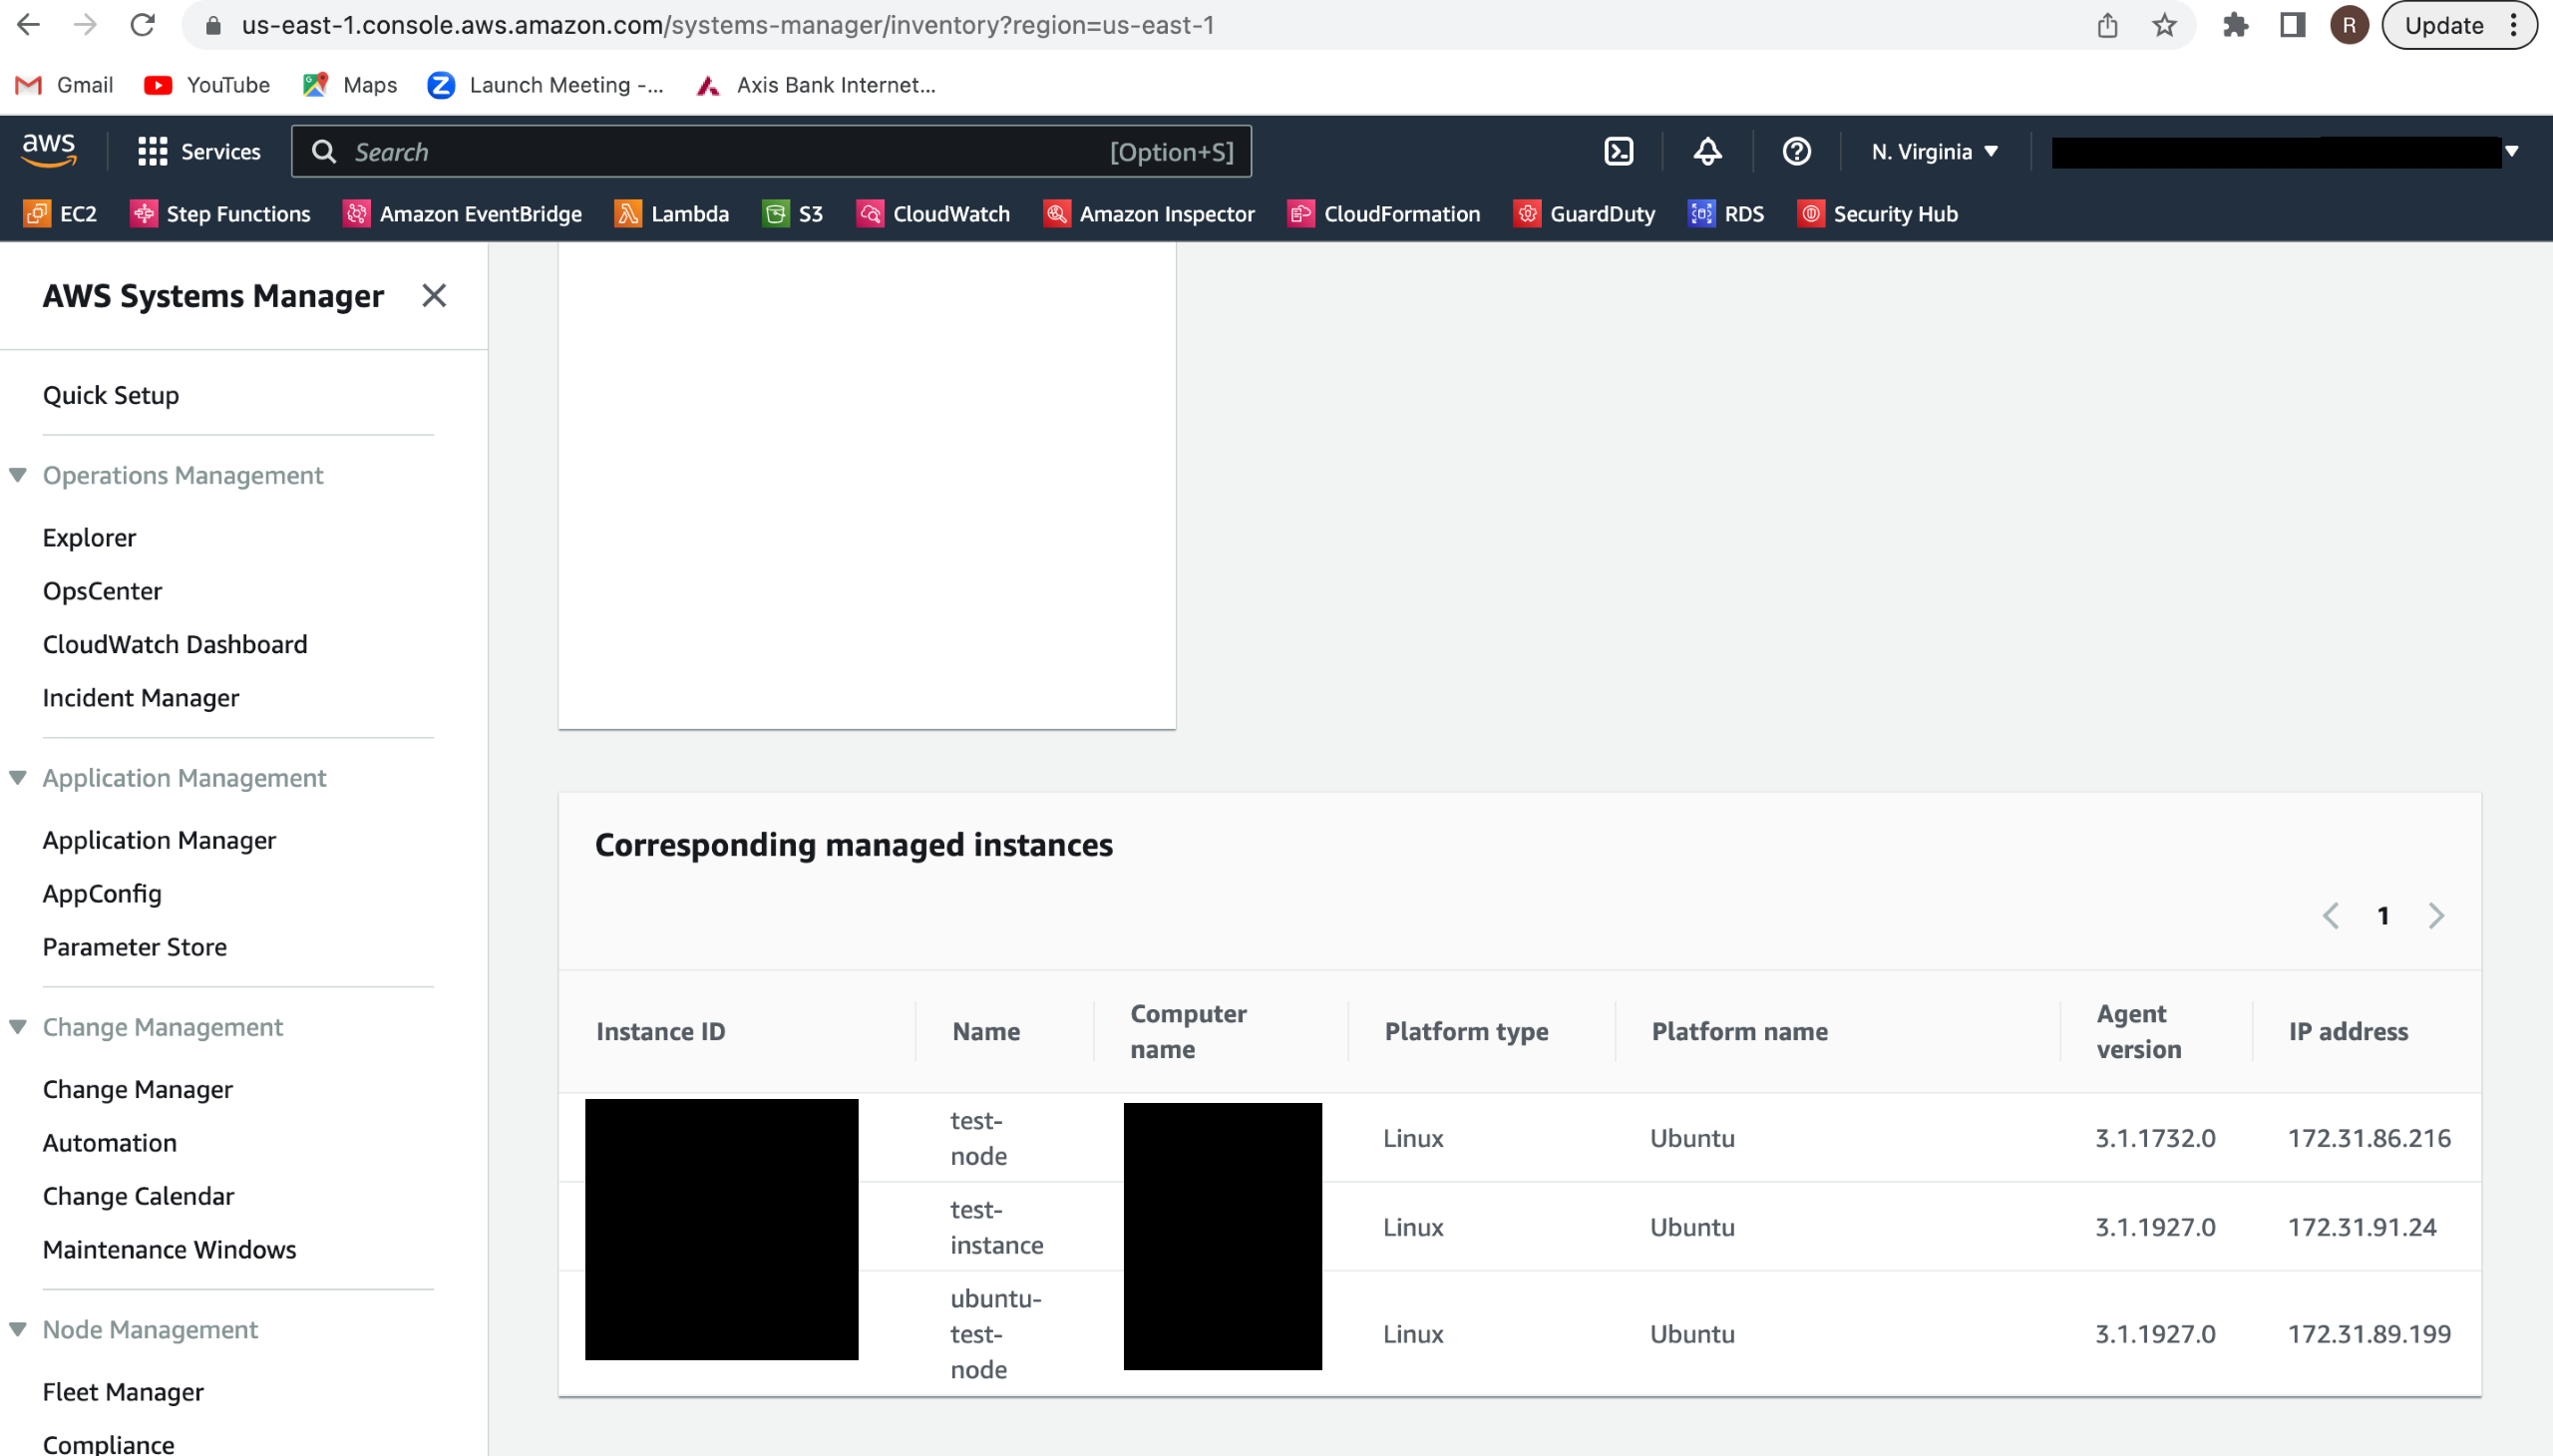
How to check if a system manager manages an EC2 instance?
- Go to the System manager console in AWS account - https://us-east-1.console.aws.amazon.com/systems-manager
- Do a quick setup if not done already
- Go to Node management > Inventory
- On the inventory page, you will see a list of EC2s managed by the system manager. Verify if your EC2 is on the list.
Easiest way to enable system manager for EC2
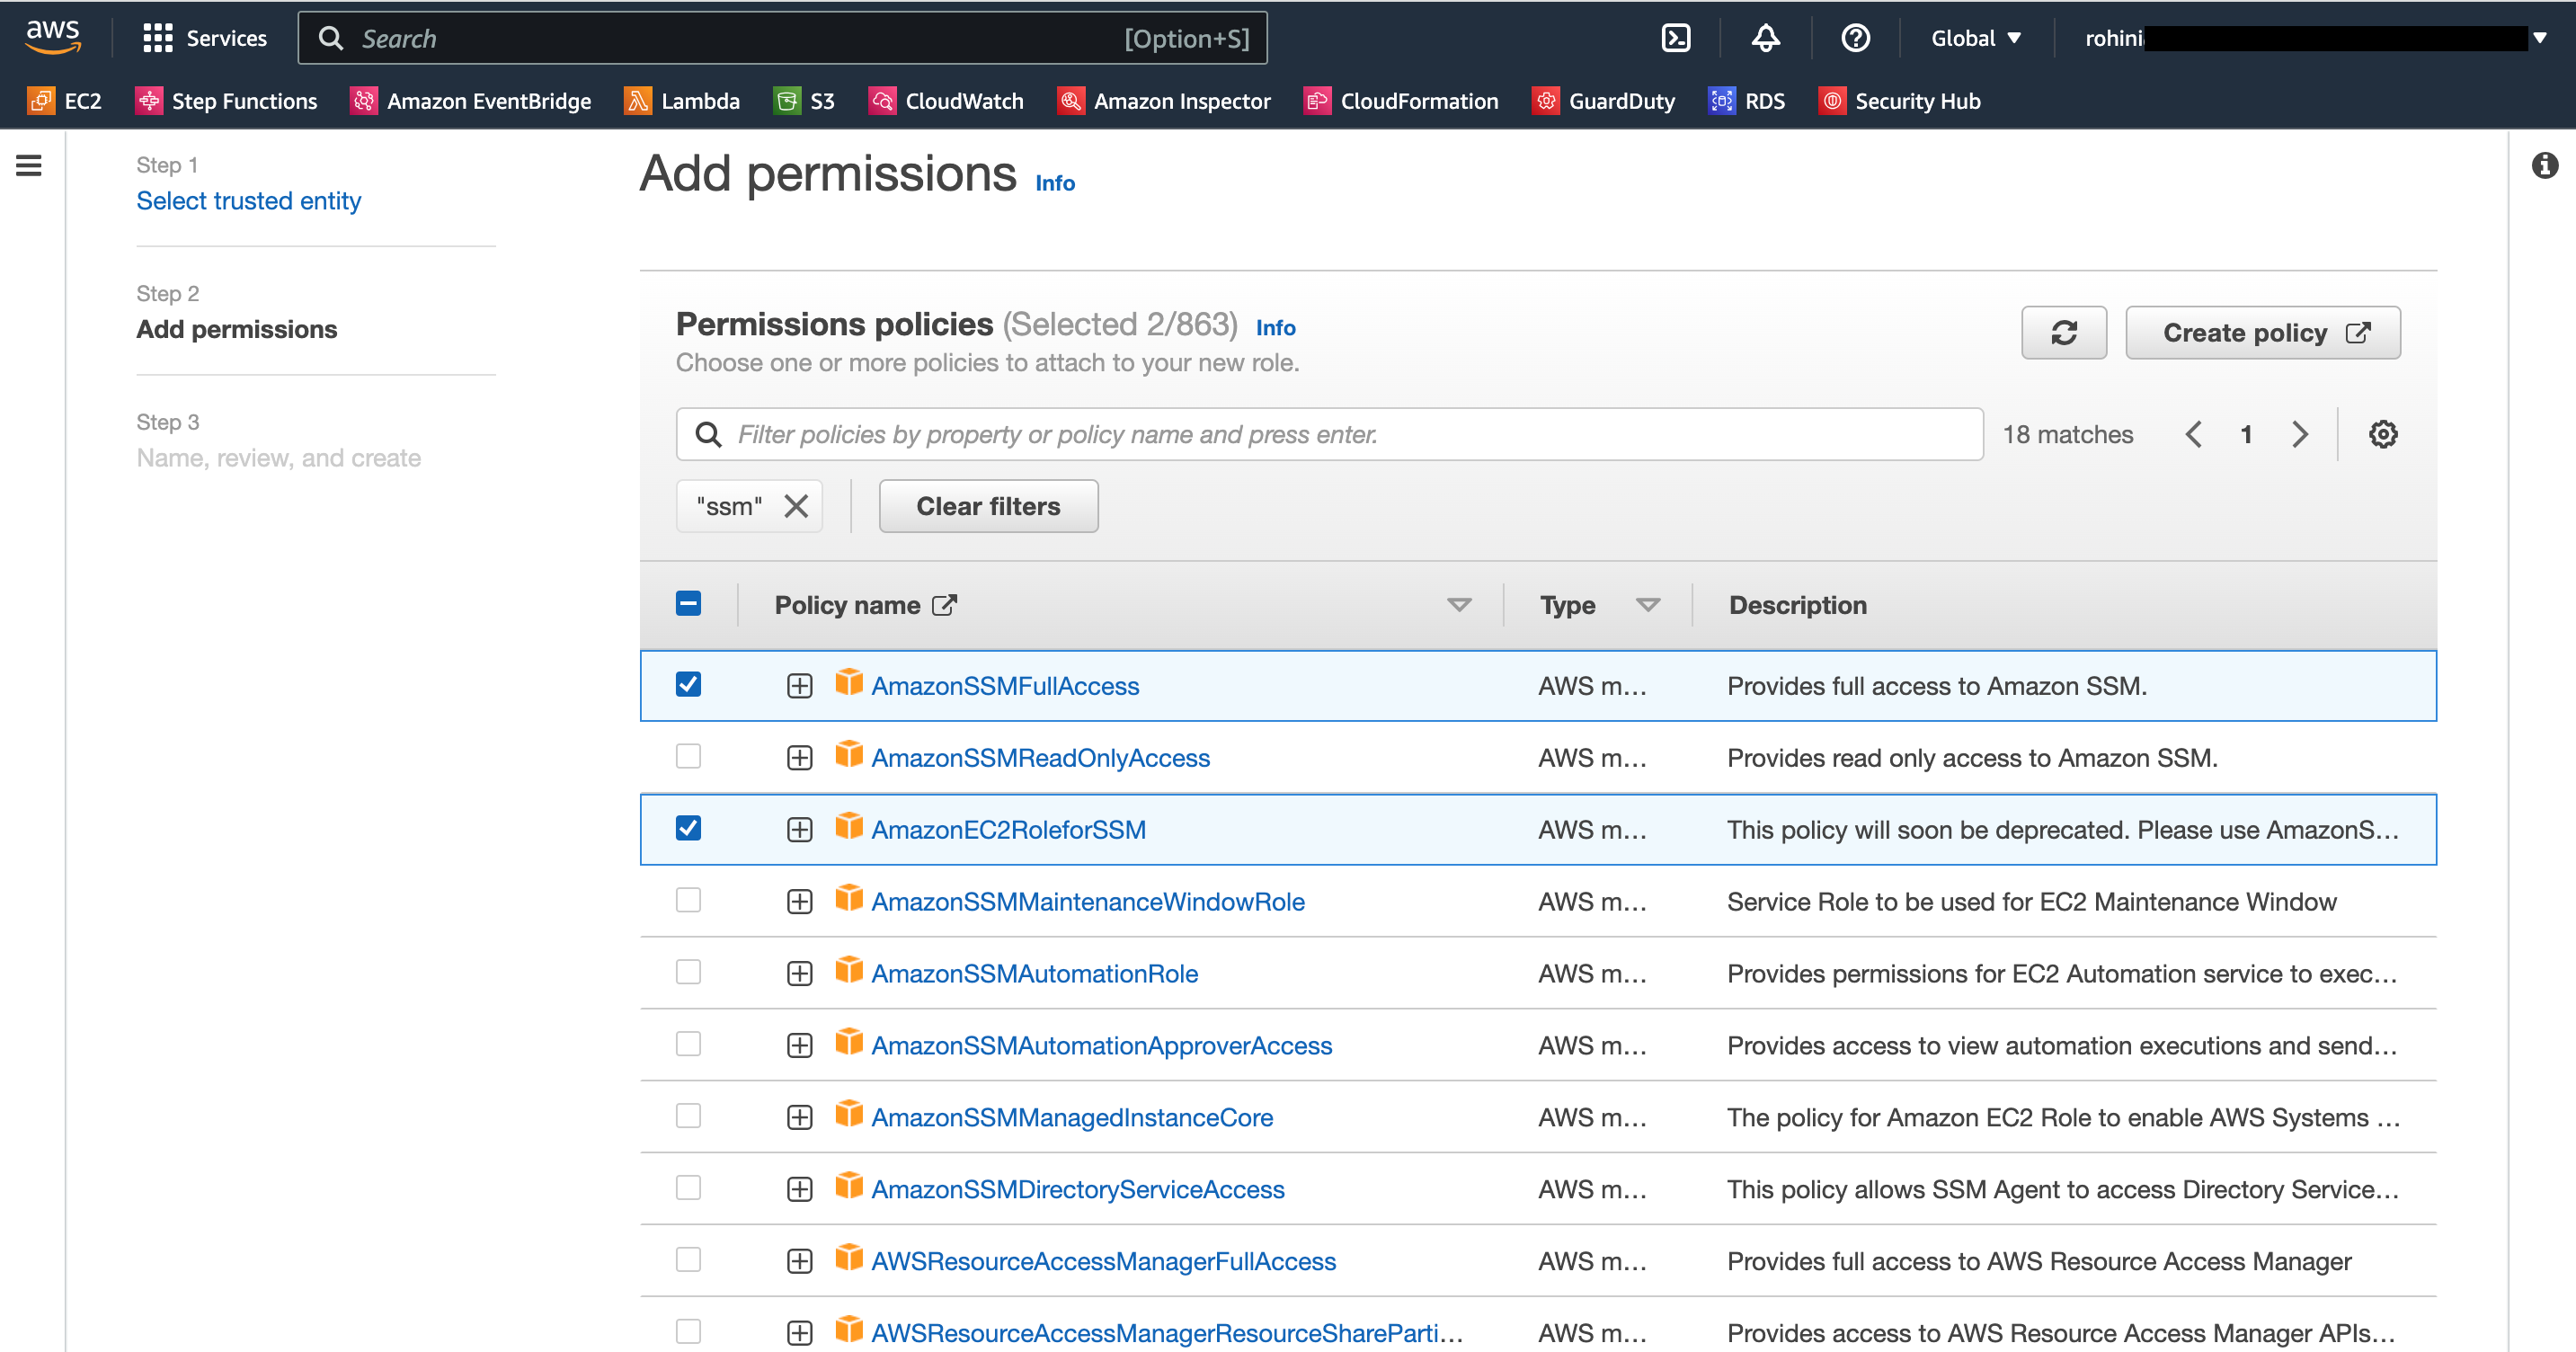
- Go to the IAM manager in the AWS account -
- Click on Role > Create role
- Select trusted entity type as AWS service and common use cases as EC2
- Click on next
- Select policies - AmazonEC2RoleforSSM and AmazonSSMFullAccess
- Click on next > enter roles name > click on create role
- Once the role is created, go to EC2, for which you want to enable the system manager
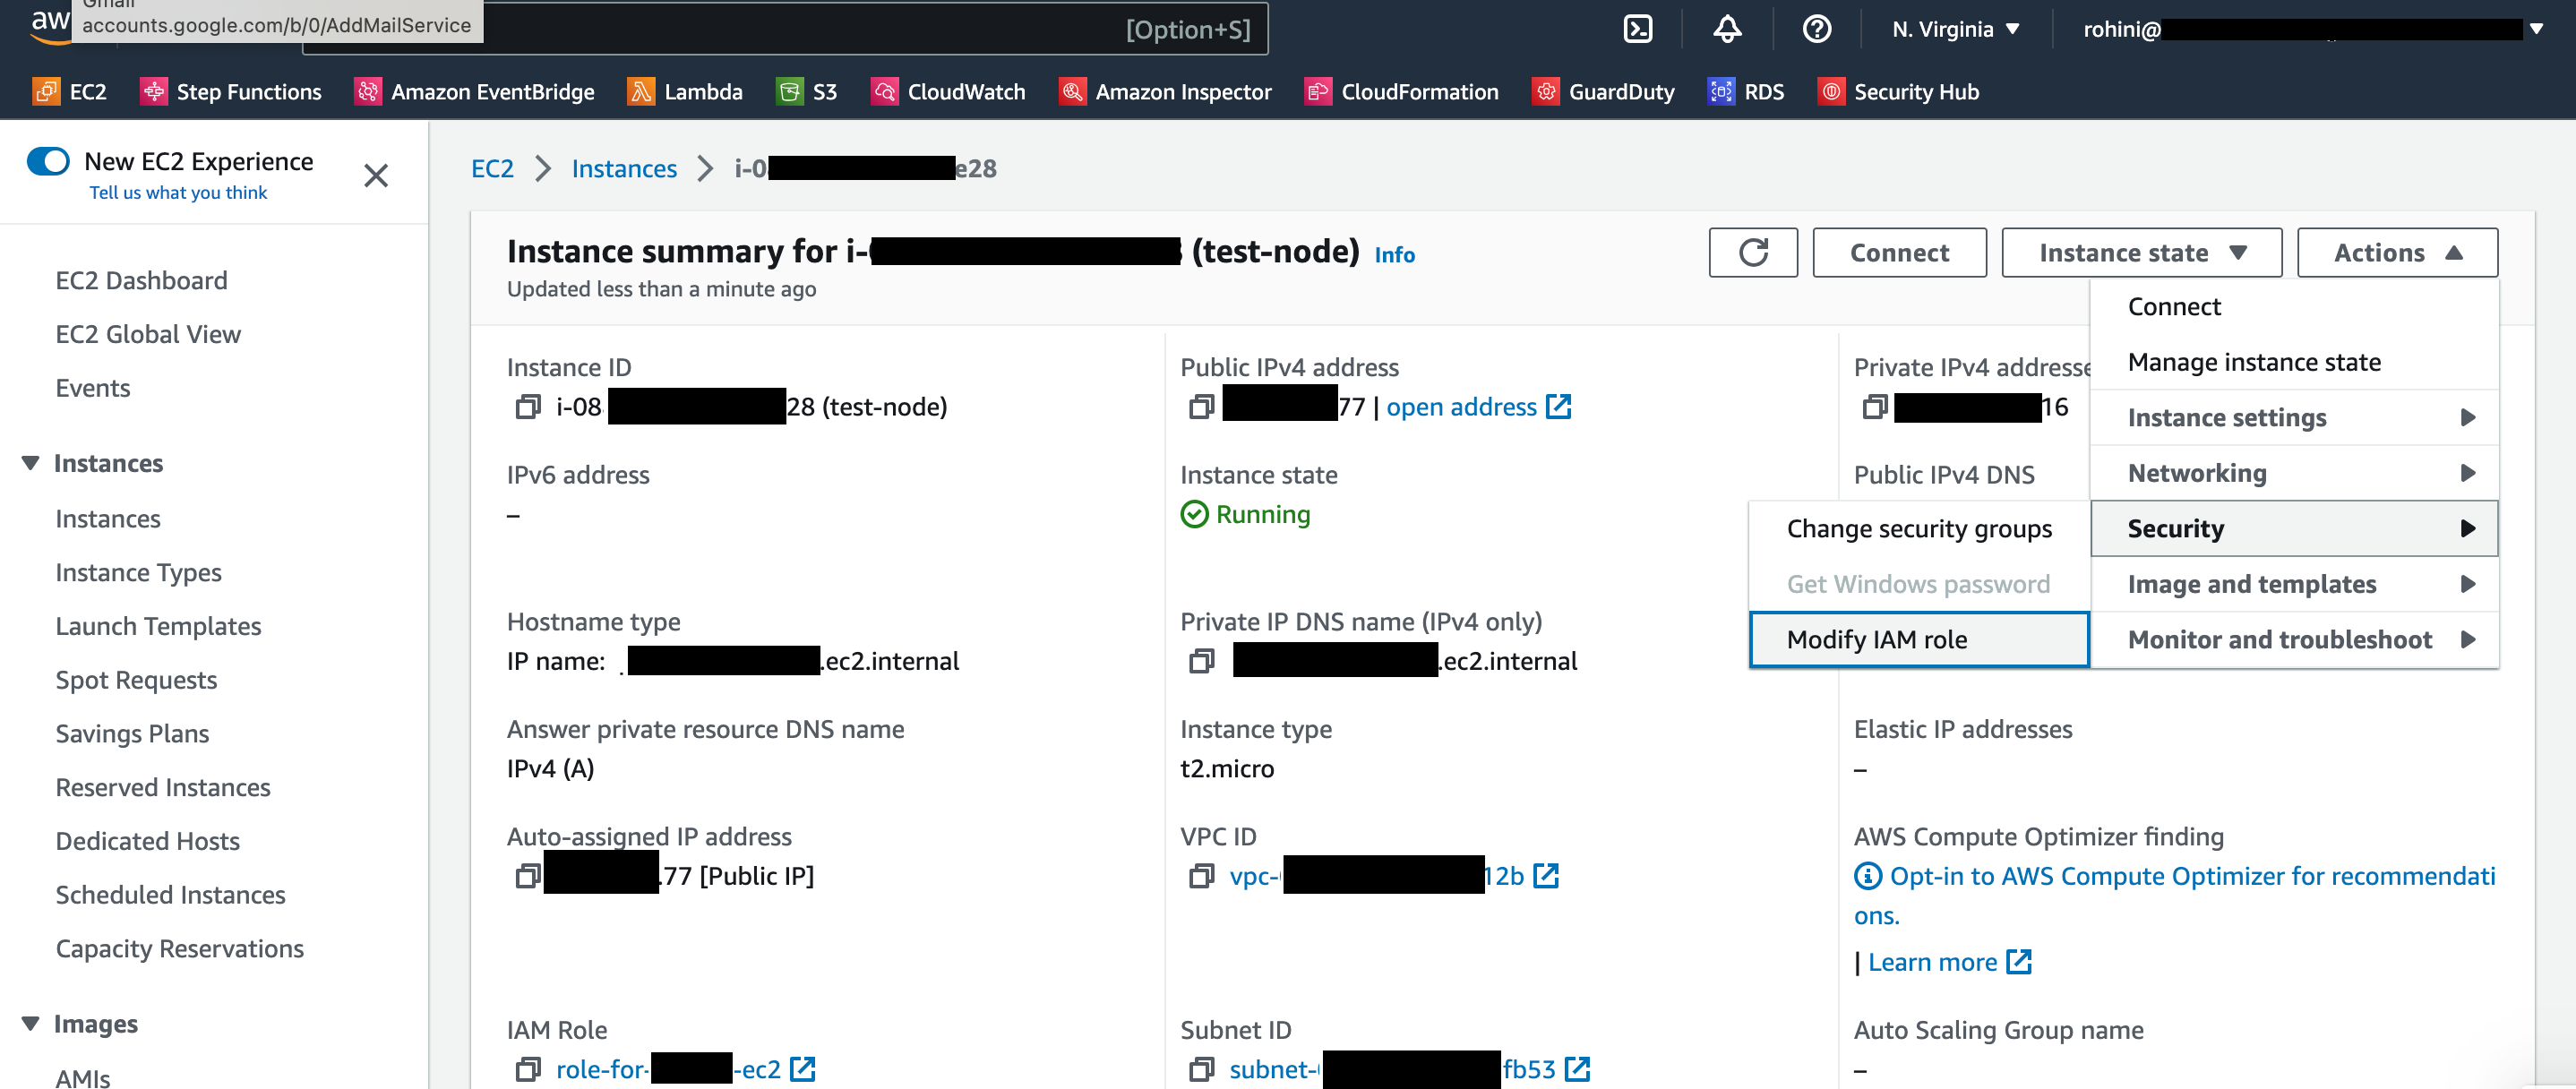
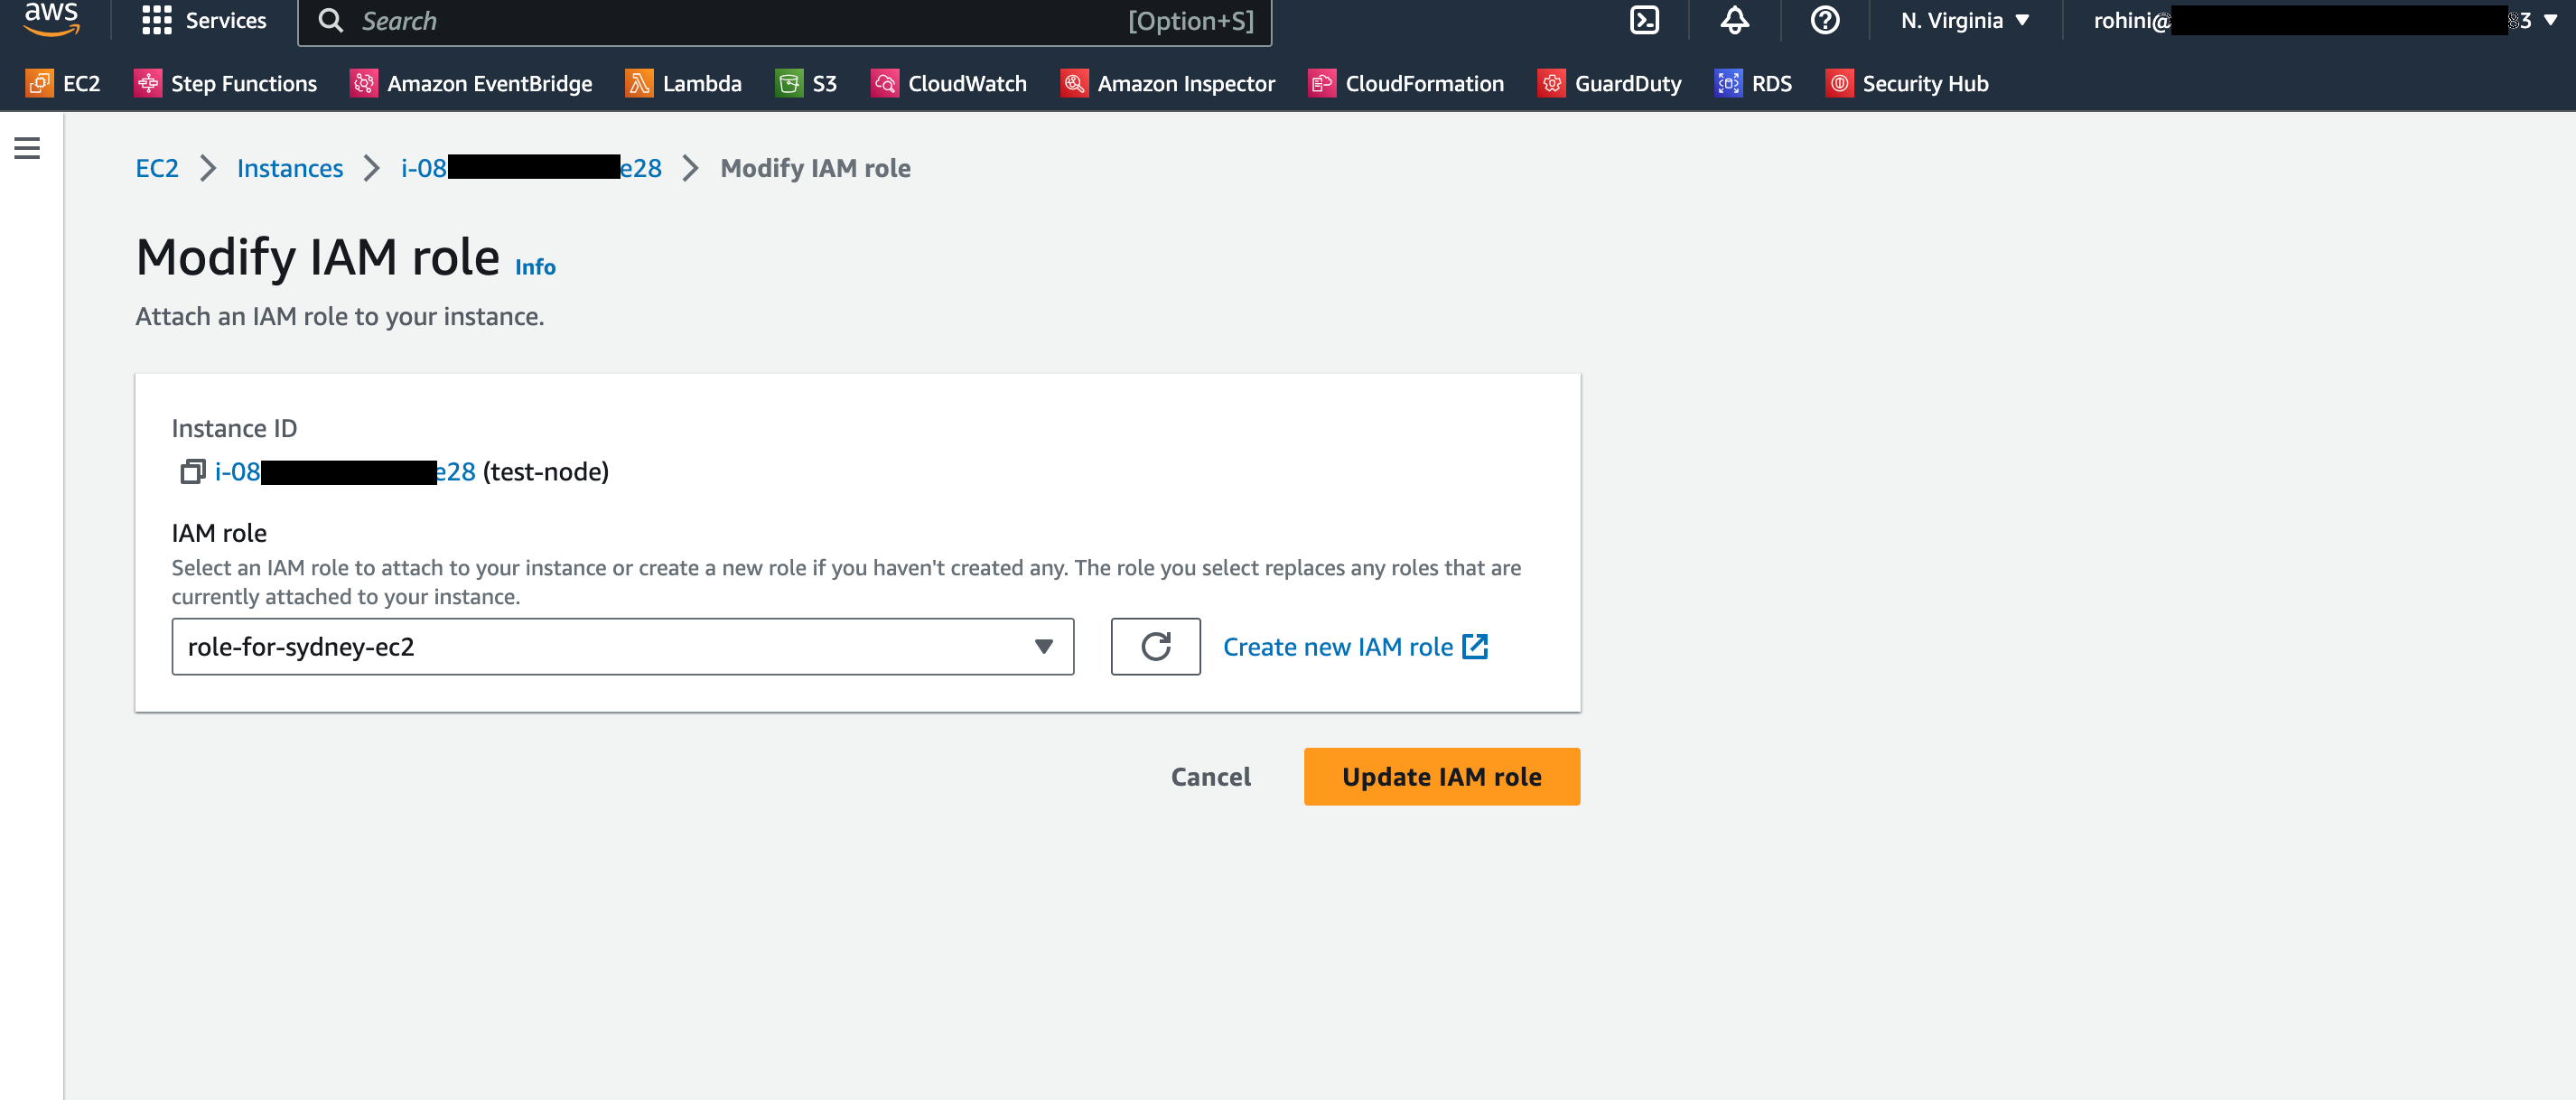
- Click on actions > Security > Modify IAM role
- Select the IAM role created in step number 6 and attach it to EC2
- Once the role is updated. Verify EC2 in the inventory list of the system manager.
How to verify if your EC2 is getting scanned by an inspector?
- Open Amazon Inspector
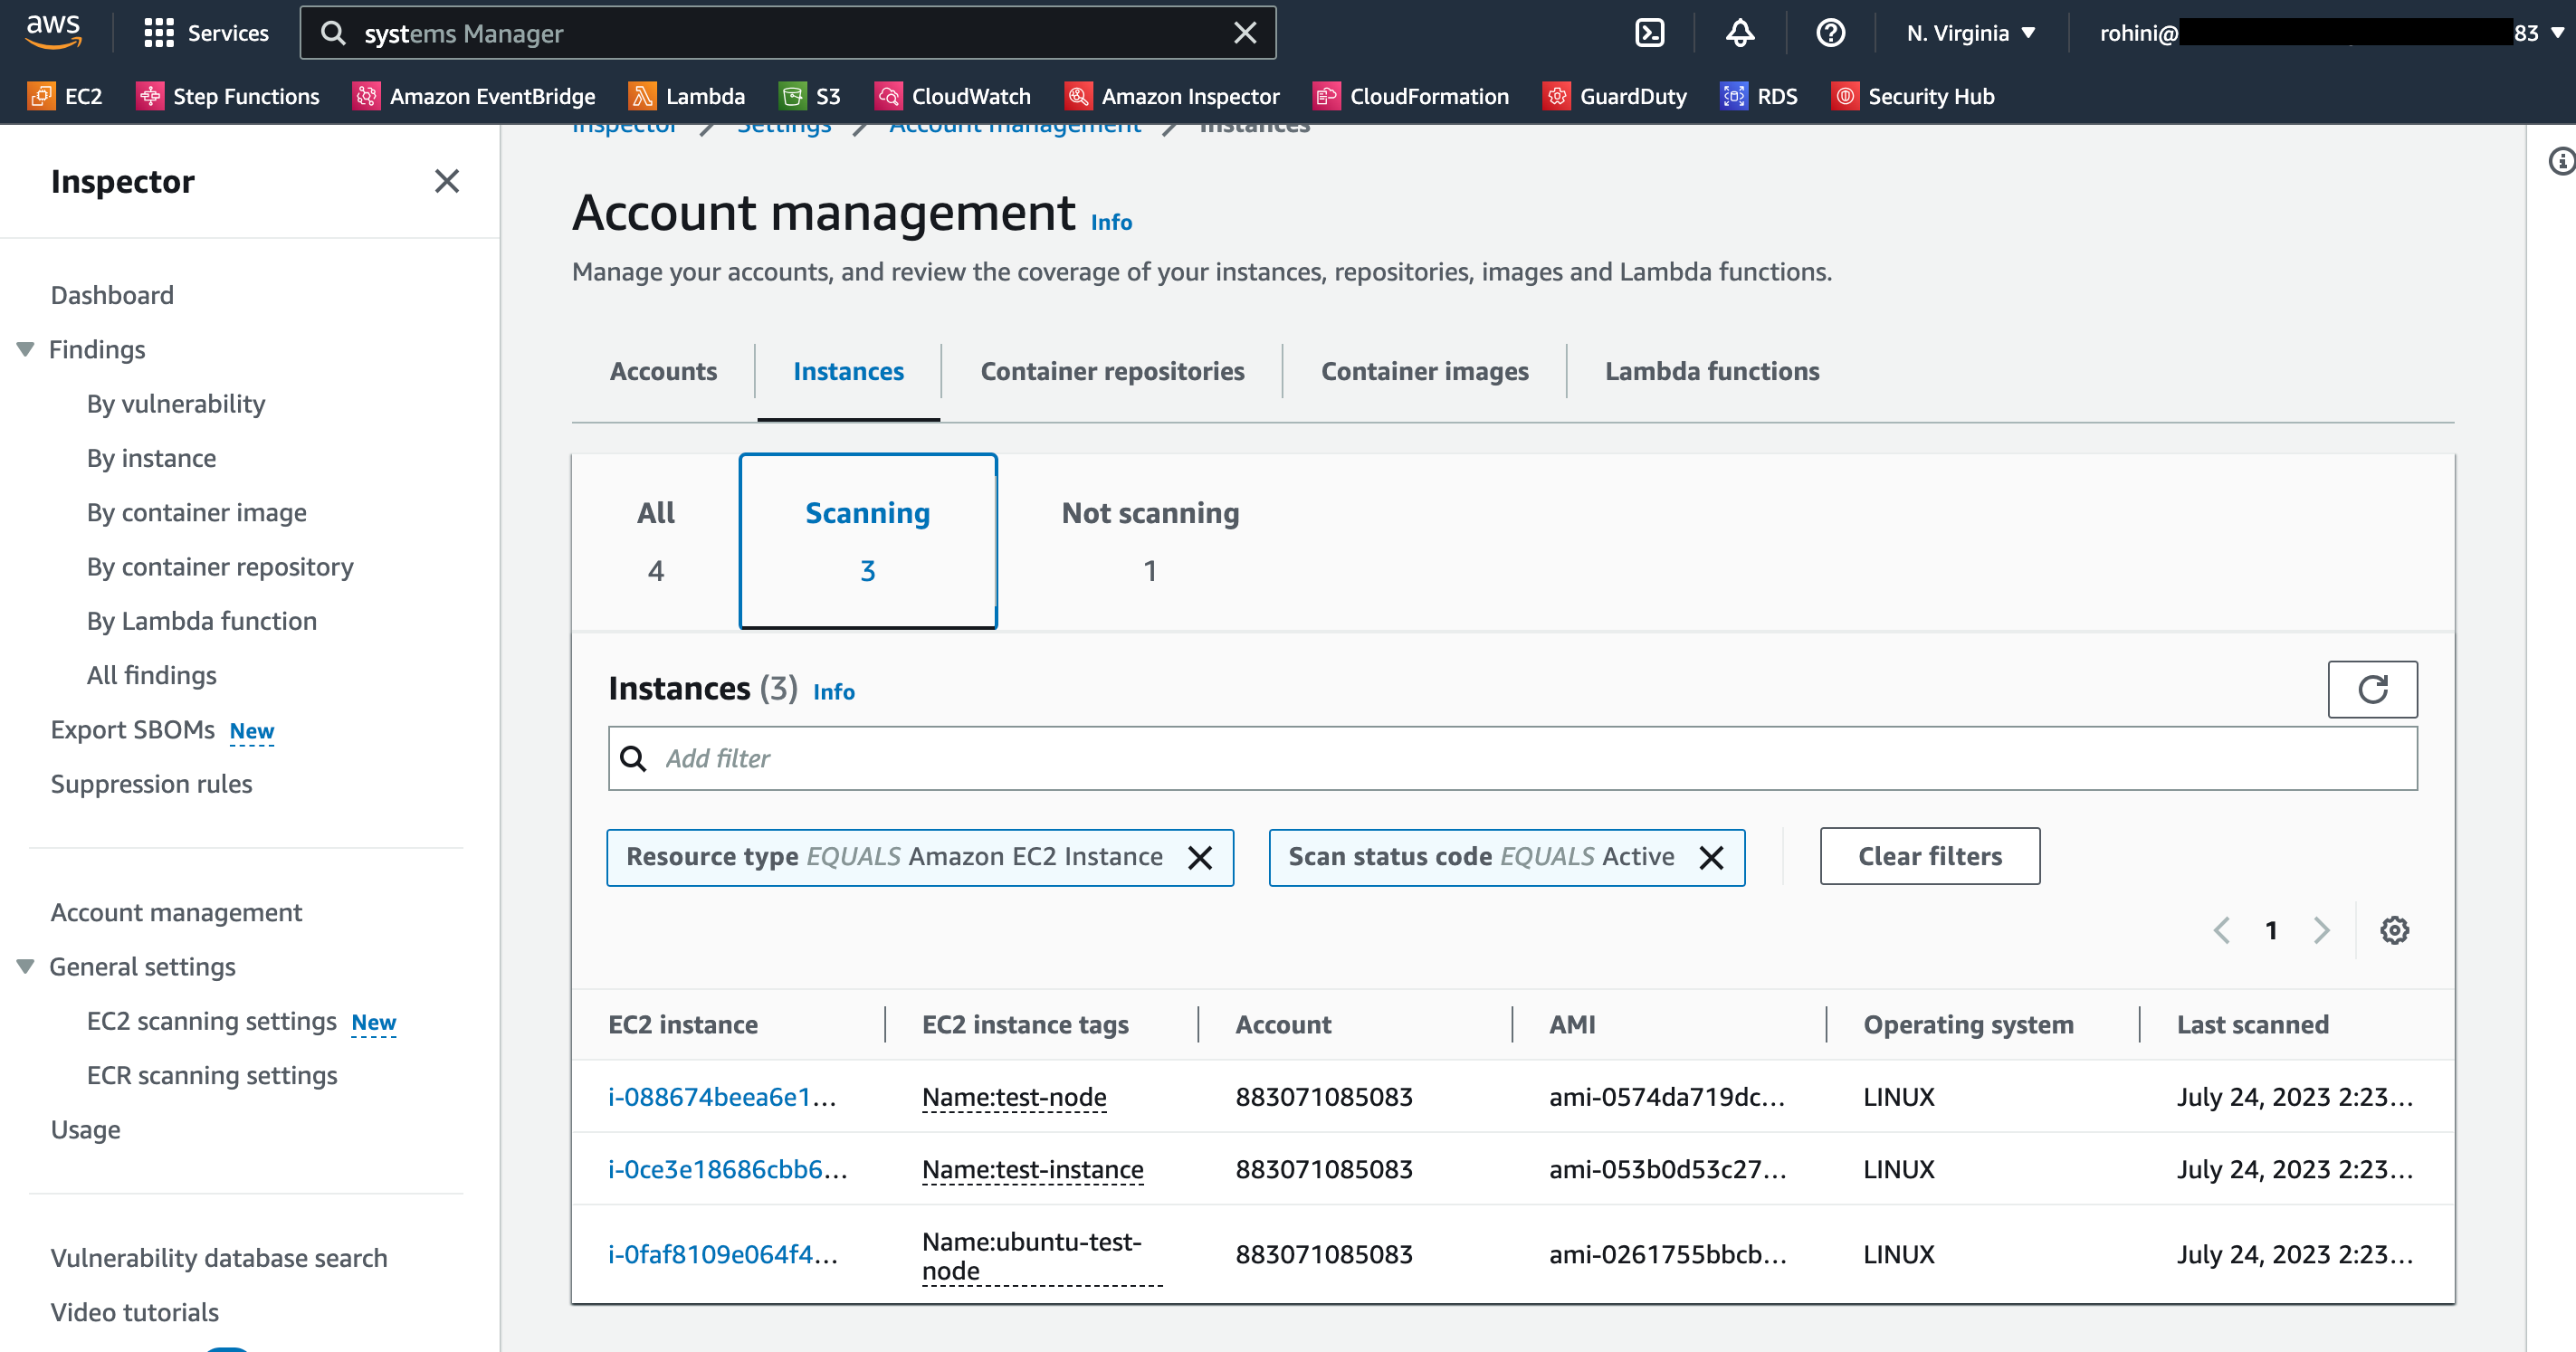
- Go to Account management > click on the instances tab
- You will see a section named 'Scanning'; it shows the EC2s that are getting scanned. Verify your EC2 in the list.
How to intentionally generate package vulnerability events in Inspector?
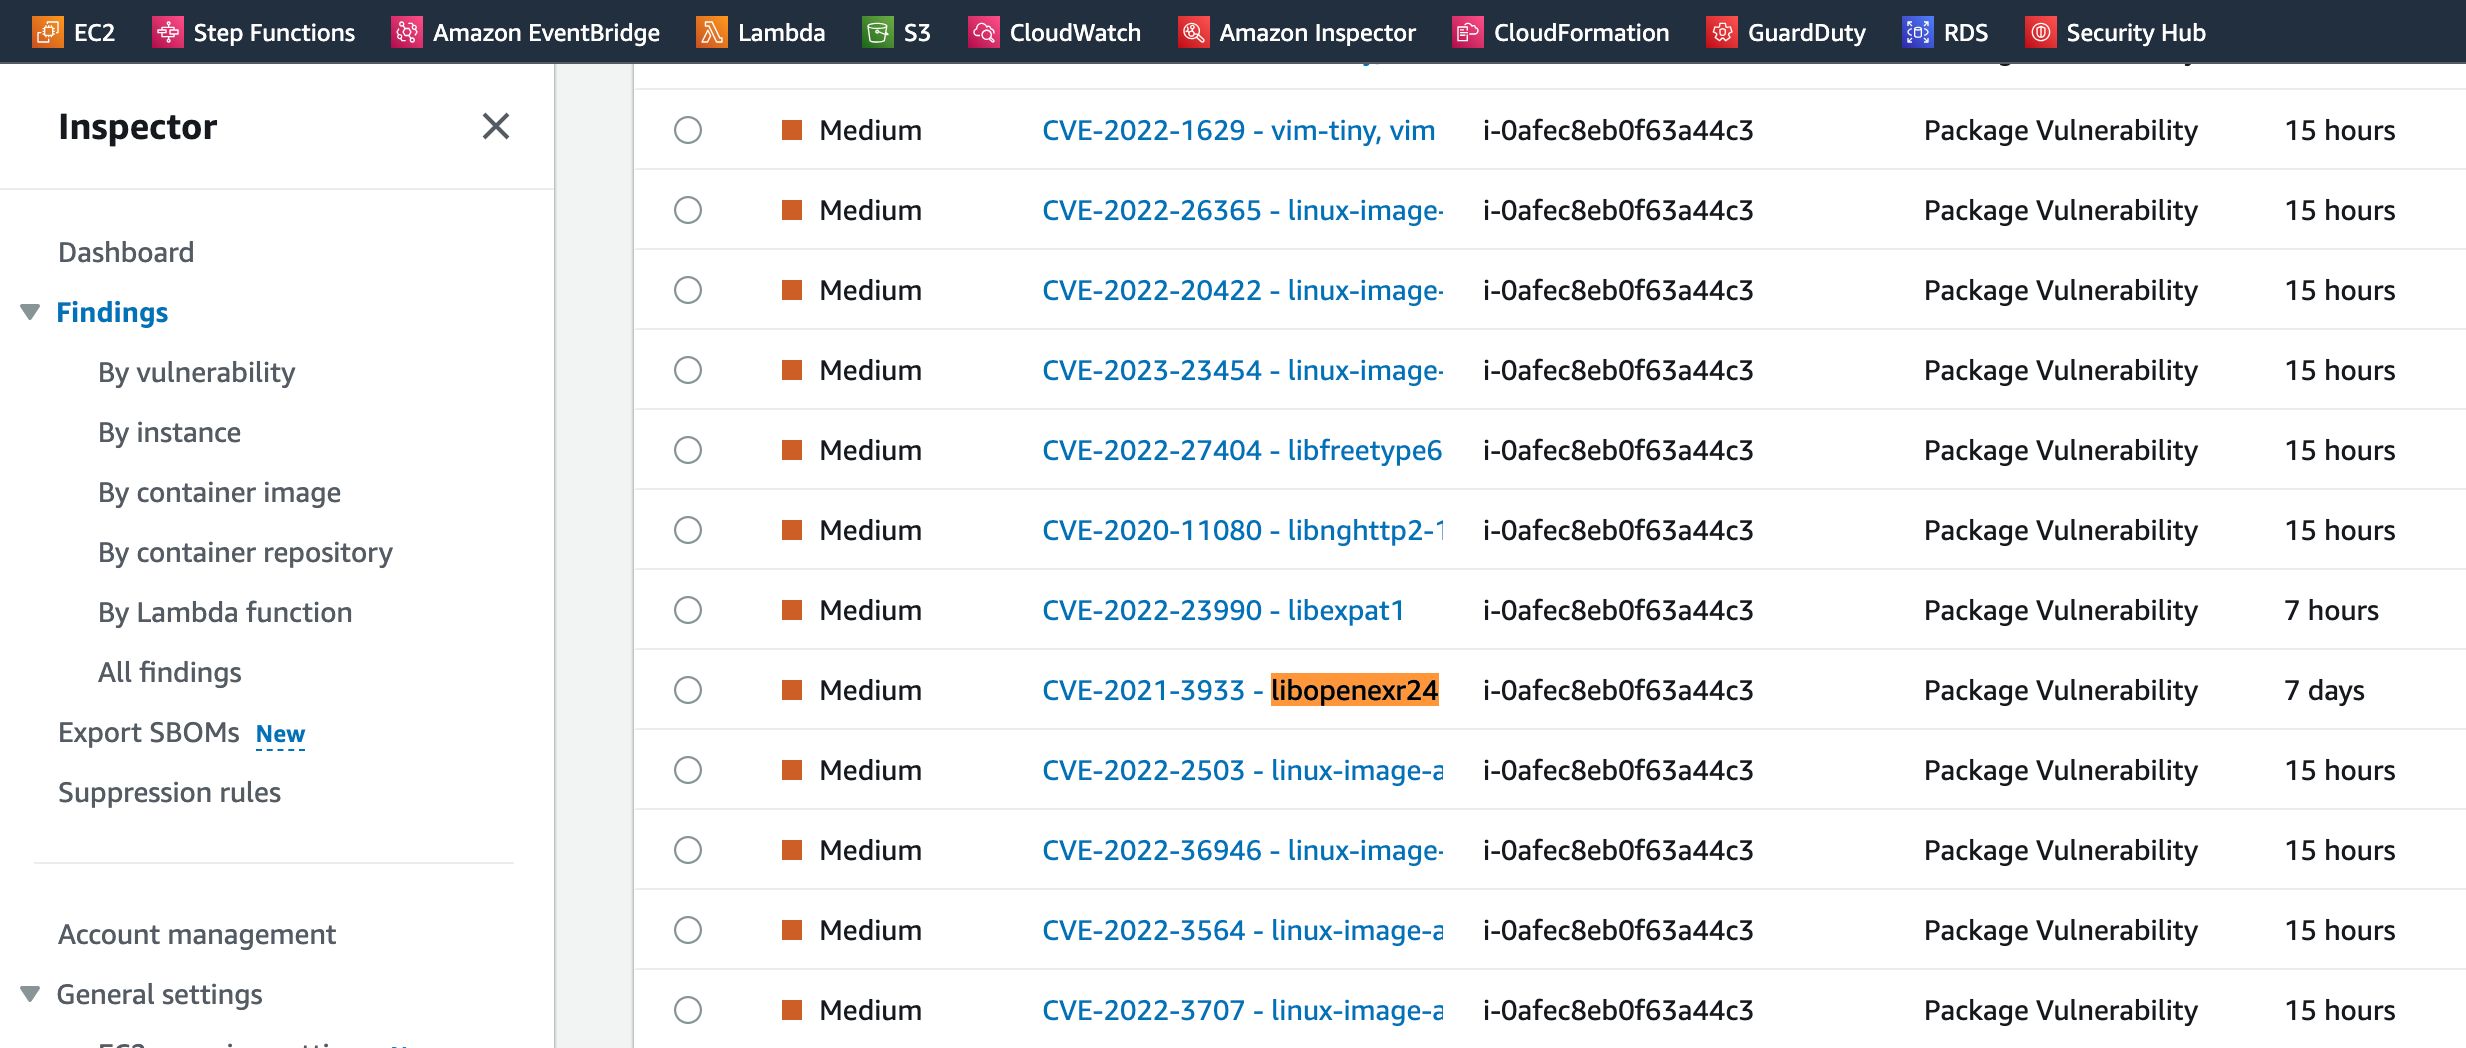
After creating EC2 instance with Ubuntu Server 22.04 AMI/Ubuntu Server 20, this AMI will by default generate some medium and low severity package vulnerabilities based on default package installation during launch of EC2 such as CVE-2022-40897 - python3-setuptools,CVE-2023-22809 - sudo, CVE-2022-33070 - sudo, CVE-2022-41903 - git,CVE-2022-23521 - git,CVE-2022-42898 - libgssapi-krb5-2,CVE-2018-20217 - libgssapi-krb5-2. (ensure the IAM role with required SSM policies is attached while creating EC2 ).
Not sure about the right tools for your DevSecOps? This blog will help!
You can also intentionally install software packages with vulnerabilities to create package vulnerability findings.
Install the below mentioned packages on Ubuntu Server 20.04 EC2 to generate the respective finding.
1. Libopenexr24
To generate finding, run the below commands -
sudo apt update
sudo apt-get install libopenexr24 2.3.0
This will generate the below finding -
Low Severity -
CVE-2021-3598 - libopenexr24
CVE-2021-3941 - libopenexr24
CVE-2021-23215 - libopenexr24
CVE-2021-20296 - libopenexr24
CVE-2021-26260 - libopenexr24
Medium Severity -
CVE-2021-3605 - libopenexr24
CVE-2021-3933 - libopenexr24
2. Liblog4j2-java
To generate the findings, run below commands -
sudo apt install liblog4j2-java=2.11.2-1
This will generate the below finding -
Medium Severity -
CVE-2021-44832 - liblog4j2-java
CVE-2021-45105 - liblog4j2-java
High Severity-
CVE-2021-45046 - liblog4j2-java
CVE-2021-44228 - liblog4j2-java
How to resolve these findings to keep your EC2 secure?
The findings indicate which package has introduced the vulnerability. To resolve this, you need to either remove or install the latest version of that package on your EC2. AWS also provides a remediation link for some of the findings, and you can also go and check the suggestions provided by AWS.
Once the finding is resolved, its status will be changed to closed, and you can check these findings under closed issues.
Finding 2 - Network Reachability:
- Another type of finding that the Inspector supports is network reachability. This finding is generated when a possible network path is available to your EC2.
- The external world can misuse this path, and your EC2 can get compromised.
- Network reachability findings are generated only for EC2 instances. The Inspector scans for Network Reachability issues every 24 hours. Regardless of SSM agent status, all of your EC2 instances will be scanned for network exposure issues.
Prerequisites:
The only Prerequisite required for an inspector to catch network reachability issues is that you need to enable the Inspector. Follow this document to enable Inspector - Activate Amazon Inspector.
How to intentionally generate network reachability for EC2?
- These findings appear when your TCP and UDP ports are reachable from an internet gateway, a VPC peering connection, or a VPN through a virtual gateway.
- There are several ways to generate these findings, but in this blog, I will talk about the simplest way to generate network reachability findings, and that is making TCP/UDP ports of your EC2 open to the internet gateway.
- Below are the details about some network reachability findings and how to generate them.
Port 22 is reachable from an Internet Gateway
To generate this finding, follow these steps:
- Go to EC2 for which you want to generate this finding
- Click on security > click on security group > edit inbound rules
- Add rule > select type as SSH that is port range would be 22
- Set source as anywhere IPV4
- Click on Save rules

- After the steps mentioned above, port 22 on your ec2 will be reachable from the internet gateway, generating medium severity network reachability finding for port 22.
- You can check open network paths in details of generate finding in the AWS inspector.

Similar to port 22 ne within AWS, there is a wide array of security services available to assist you in attaining the utmost level of security for your environment, with the Amazon Inspector service being just one among them. Findings for below-mentioned ports, having different severity, can also be generated by following the same steps.
| Service | TCP ports | UDP ports | Internet path rating |
|---|---|---|---|
| DHCP | 67, 68, 546, 547 | 67, 68, 546, 547 |
Medium |
| Elasticsearch | 9300, 9200 | NA | Medium |
| FTP | 21 | 21 | High |
| Global catalog LDAP | 3268 | NA | Medium |
| Global catalog LDAP over TLS | 3269 | NA | Medium |
| HTTP | 80 | 80 | Low |
| HTTPS | 443 | 443 | Low |
| Kerberos | 88, 464, 543, 544, 749, 751 | 88, 464, 749, 750, 751, 752 | Medium |
| LDAP | 389 | 389 | Medium |
| LDAP over TLS | 636 | NA | Medium |
| MongoDB | 27017, 27018, 27019, 28017 | NA | Medium |
| MySQL | 3306 | NA | Medium |
| NetBIOS | 137, 139 | 137, 138 | Medium |
| NFS | 111, 2049, 4045, 1110 | 111, 2049, 4045, 1110 | Medium |
| Oracle | 1521, 1630 | NA | Medium |
| PostgreSQL | 5432 | NA | Medium |
| Print services | 515 | NA | High |
| RDP | 3389 | 3389 | Medium |
| RPC | 111, 135, 530 | 111, 135, 530 | Medium |
| SMB | 445 | 445 | Medium |
| SSH | 22 | 22 | Medium |
| SQL Server | 1433 | 1434 | Medium |
| Syslog | 601 | 514 | Medium |
| Telnet | 23 | 23 | High |
| WINS | 1512, 42 | 1512, 42 | Medium |
How to resolve these findings?
The findings I explained above indicate that your ports are open to internet gateways, so to resolve this, you can either delete the inbound rule added for that port in the security group of your EC2 or assign a valid resource IP address to it. AWS also provides a remediation link for some of the findings. You can also go and check the suggestions provided by AWS.
Once the finding is resolved, its status will be changed to closed, and you can check these findings under closed issues.

In my upcoming blogs, I'll write about other security services AWS provides, such as the security hub, Amazon access analyzer, and Guard duty.
Related Blogs


