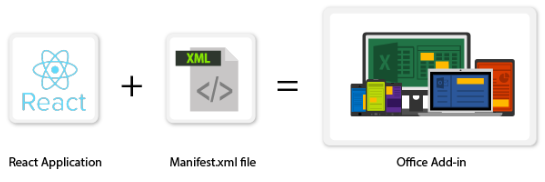
Configuring an Office JS word add-in with ReactJS without the Yeoman generator

Posted By
Chandan Jawale

“Every once in a while, a new technology, an old problem and a big idea turn into an innovation.”
– Dean Kamen, Inventor of Segway
With the ever-changing work environment requirements, there is a constant need for innovation and extending the functionality of our daily-use applications to enhance productivity and ensure a product’s survival in today’s world. Microsoft Office is one such market-leading application platform that also allows users to extend the functionality of its product suite in a similar fashion with the help of add-ins.
Ever wondered if there was a possibility to have an in-built language translator or maybe an auto-document assembly tool in Microsoft Word or if a Microsoft Excel sheet could become intelligent enough to devise formulae based on the data by itself? With the use of Office add-ins, all of this is a possibility now. Surprisingly a lot of people are still unaware of the Microsoft Office Store and the sheer number of add-ins it offers, both in free as well as paid domains. Office add-ins nowadays can do almost anything a webpage can do inside a browser and, as a result, continue to grow in complexity day by day. Through this blog, I will attempt to simplify one of the methodologies for building an add-in for an Office app with ReactJS.
The Microsoft Office JavaScript APIs are available through the office.js library and they enable users to create web apps that interact with the object models in Office host applications. Office.js acts as a script loader that loads the object models that are applicable to the Office application that is running the add-in. Office add-ins run inside the Office application and can interact with the contents of the Office document using the rich JavaScript API.

Under the hood, an Office add-in is just a web app that can be hosted anywhere including Office for Windows, Office Online, Office for Mac, and Office for iOS. Using the manifest.xml file, we can tell Office application the location of our web app and how we want it to appear. The Office application will then take care of hosting it within Office.
The benefits of using Office JS while building add-ins include the following:
-
Apps for Office are particularly well suited for creating web mashups using Office as a surface to expose the existing web functionality.
-
Apps for Office work seamlessly with the desktop Office application as well as an online application. Cross-platform support is also present, due to which Office add-ins run in Office for Windows, Mac, iOS, and Office Online.
-
Apps for Office use html/java-script which supports highly interactive UI using CSS and JavaScript and allows the users to do tons of customizations for a different client while maintaining the integrity of the core functions.
-
In most cases, an Office add-in can read from or write to the host application. For example, if the user types “Hello World” in a document using Microsoft Word and clicks on your app's button, the app has the capability to read that text and replace it with the Spanish equivalent 'Hola Mundo'. Due to this, the user can export data from external sources or third-party apps and work with it.
-
Hosting and distribution of add-ins developed using JavaScript API is easy using office store and Appsource. Office store manages the complete licensing process and cycle. You can make your solution available to a broader audience by submitting it to AppSource.
-
Centralized deployment and distribution can be done using the Office add-ins, and admins can deploy Office add-ins centrally across an organization.
We can build an Office add-in using a Visual Studio Editor or any other editor easily, but configuring the web app in ReactJS specifically using the Visual Studio Editor or any other editor with Yeoman generator can be very cumbersome due to the complex configurations involved as both these methodologies result into the generation of manifest and app files which are heavily customized and not friendly with ReactJS.
To generate and configure our app with ReactJS in a better and faster way, we can use the following steps:
Prerequisites:
We need to have the following packages on our workstation
- Node js - v6.11.0
- npm - v5.8.0
- Create-react-app - v1.4.0
Step 1: Setting up the Project
The Create React App is a tool used for building React applications. It saves the time consumed for setting up and configuration and sets up the packages needed for starting the React project using a single command thus simplifying the entire process.
To create a react application using create-react-app, simply run the below command:
create-react-app my-word-addin
Step 2: Add office.js reference in public/index.html
The Office JavaScript API enables users to build their own applications (web) which interact with the object models in Office host applications. These applications refer the office.js library which acts as a script loader. The library, in turn, loads the object models that are required by the Office application to run the add-in. There are two ways to install the Office.js library.
a) Install Office.js using a CDN link :
<script src="https://appsforoffice.microsoft.com/lib/1/hosted/office.js"></script>
b) Install Office.js using the NPM package :
npm install @microsoft/office-js --save
Once installed, the Office.js script reference can be used as
<script src="node_modules@microsoftoffice-jsdistoffice.js"></script>
Step 3: Add the following code snippet into the Index.js to initialize the Office JS
Now that you have installed/added a reference of office.js as suggested in step 2, you need to initialize/load the office.js library in order to be able to work with office object model.
const Office = window.Office;

Office.initialize = () => {
  ReactDOM.render(
     ,
    document.getElementById('root'));
};
Step 4: We can either download the default manifest file (.xml) from the Office JS site or build it as per the custom requirements (pre-initialized add-in, tasks pane logo, and so on..)
A sample manifest file as per a set of custom requirements will look like the one shown below:
<?xml version="1.0" encoding="utf-8"?>
<OfficeApp xmlns="http://schemas.microsoft.com/office/appforoffice/1.1"
   xmlns:xsi="http://www.w3.org/2001/XMLSchema-instance"
   xsi:type="TaskPaneApp">
   <Id>77f14ss-636e-3462-b38c-76b8a9afeb70</Id>
   <Version>1.0.0.0</Version>
   <ProviderName>Abacus Inc.</ProviderName>
   <DefaultLocale>en-US</DefaultLocale>
   <DisplayName DefaultValue="abacus-docs" />
   <Description DefaultValue="The Abacus App for Word enables you to work with matter related documents inside Word"/>
   <Hosts>
   	<Host Name="Document" />
   </Hosts>
   <DefaultSettings>
   	<SourceLocation DefaultValue="https://localhost:3000/index.html"/>
   </DefaultSettings>
   <Permissions>ReadWriteDocument</Permissions>
</OfficeApp>
With that, you are all set to go. You should now be able to develop your Office add-in using ReactJS and Office JavaScript APIs effortlessly. To test the add-in, you can deploy it using any of the methodologies listed below:
Sideloading As part of your development process, test your add-in running on Windows, Office Online, iPad, or Mac.
Centralized Deployment In a cloud or hybrid deployment, distribute your add-in to users in your organization by using the Office 365 admin center.
SharePoint catalog In an on-premises environment, distribute your add-in to users in your organization.
AppSource To be able to distribute your add-in publicly to users.
With the Yeoman generator, you have to stick with the questionnaire wizard, which may lead to common configuration issues. With the above-mentioned easy steps, you can build an Office add-in using ReactJS, which can save yourself from all this hassle.
Related Blogs


