


Posted By

Efficiently managing containerized applications in Kubernetes involves a critical component: autoscaling. This dynamic allocation of resources based on demand is essential for optimizing performance and cost-effectiveness. However, implementing autoscaling can be challenging, especially when integrating external metrics and working with Horizontal Pod Autoscaler (HPA).
This is where Kubernetes Event-driven Autoscaling (KEDA) steps in. With KEDA, autoscaling becomes more flexible and powerful, allowing you to scale your applications based on a wide range of metrics, including Prometheus metrics. This blog will walk you through the process of autoscaling with KEDA and show you how to efficiently scale your applications in a Kubernetes environment.
Why should you autoscale in Kubernetes
The number of containers running an application in a Kubernetes cluster can vary based on demand. Traditionally, this scaling process required manual intervention or tedious scripting, leading to inefficient resource allocation and potential downtime during peak traffic. However, the ability to adjust resource allocation based on autoscaling has been a game-changer. Let’s find out how.
Benefits of autoscaling in Kubernetes
With the ability to automatically adjust resource allocation based on demand, autoscaling in Kubernetes provides the following benefits:
- Improved performance: Autoscaling ensures applications can handle high traffic loads without compromising performance. The applications remain responsive even during peak times by automatically adding resources when needed.
- Cost optimization: Autoscaling allows for efficient utilization of resources, scaling them up or down as needed. It eliminates the need for overprovisioning, saving costs on unnecessary resources. KEDA can scale down the number of pods to zero if there are no events to process. This is harder to do using the standard HPA, and it helps ensure effective resource utilization and cost optimization, ultimately bringing down the cloud bills.
- Simplified management: Autoscaling eliminates the need for manual intervention, reducing the risk of human error and improving overall operational efficiency.
Introducing KEDA: Autoscaling made easy
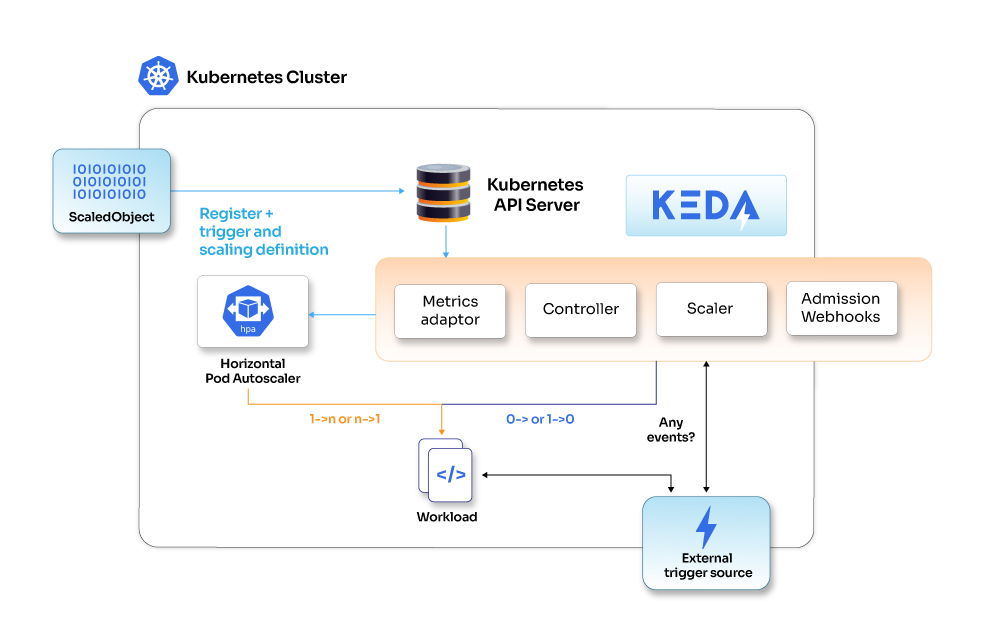
KEDA (Kubernetes Event-driven Autoscaling) is an open-source project that simplifies and enhances Kubernetes' autoscaling capabilities. It enables autoscaling based on events instead of the traditional resource utilization metrics. KEDA allows users to your applications dynamically in response to various events, such as message queue length, HTTP requests, or custom metrics emitted by your application. With KEDA, users can use various event sources, including Azure Queue, Kafka, RabbitMQ, Prometheus metrics and more. This flexibility enables the creation of scalable and responsive applications that adapt to different workload patterns.
Let’s dive deeper into the functionality of KEDA to get a comprehensive understanding and hands-on of how it works. Harnessing the power of KEDA can ensure optimal performance and resource utilization in your containerized applications.
Installing KEDA and configure autoscaling
Let’s use the Helm chart installation method to deploy KEDA to the minikube cluster. Users have the flexibility to use any vendor-specific Kubernetes cluster, provided, they have appropriate cluster access and a locally installed Kubectl client.
helm repo add https://kedacore.github.io/charts
helm repo update
helm install keda kedacore/keda --namespace keda --create-namespace
KEDA CRDS (custom resource definition) are available in your cluster once you install the Helm chart for KEDA. You must define the configuration using these CRDs.
- Scaledobjects.keda.sh
- Scaledjobs.keda.sh
- Triggerauthentications.keda.sh
- Clustertriggerauthentications.keda.sh
These custom resources allow you to link an event source (along with its authentication) to a Deployment, Custom Resource, StatefulSet, or Job for scaling purposes.
- ScaledObjects represent the desired mapping between an event source (e.g., Rabbit MQ) and the Kubernetes Deployment, StatefulSet, or any custom resource that defines /scales a subresource.
- ScaledJobs represent the mapping between the event source and Kubernetes Job.
- ScaledObject/ScaledJob may also make reference to a TriggerAuthentication or ClusterTriggerAuthentication, containing the necessary authentication configurations or secrets for monitoring the event source.
Actual functionality of KEDA
Now let's set up nginx deployment using the below manifests
nginx-deploy.yaml
apiVersion: apps/v1
kind: Deployment
metadata:
  name: nginx-deployment
  labels:
    app: nginx
spec:
  replicas: 1
  selector:
    matchLabels:
      app: nginx
  template:
    metadata:
      labels:
        app: nginx
    spec:
      containers:
      - name: nginx
        image: nginx:1.14.2
        ports:
        - containerPort: 80
        resources:
          Requests:
            Cpu: “0.5”
            memory: “200Mi”

---

apiVersion: v1
kind: Service
metadata:
  name: nginx
spec:
  selector:
    app: nginx
  type: clusterIP
  ports:
    - protocol: TCP
      port: 80
      targetPort: 80
kubectl apply –f nginx-deploy.yaml
Now, let’s set up the scaledobject based on trigger events such as average CPU and memory utilization, Prometheus metrics, etc. This scaledobject will auto-scale the replicas for targeted Nginx deployment.
Note: Please ensure the metric server should be installed in the cluster. You can install it on the cluster if it doesn't exist.
kubectl apply -f https://github.com/kubernetes-sigs/metrics-server/releases/latest/download/high-availability-1.21+.yaml
Alternatively you can also use the below command in minikube to enable it.
minikube addons enable metrics-server
Scaledobject.yaml manifest
apiVersion: keda.sh/v1alpha1
kind: ScaledObject
metadata:
  name: cpu-scaledobject
  namespace: default
spec:
  maxReplicaCount: 5
  minReplicaCount: 1
  scaleTargetRef: #scaletargerref is deployment name in the same namepsace
    name: nginx
  triggers:
  - type: cpu
  metricType: Utilization # Allowed types are 'Utilization' or 'AverageValue'
  metadata:
  value: "50"
Validating the scaling by generating load
The below command will generate the load and if it crosses the threshold defined in the scaled object, you can see the autoscaling taking place.
kubectl run -i --tty load-generator --rm --image=busybox --restart=Never -- /bin/sh -c "while sleep 0.01; do wget -q -O- http://nginx; done"
Prometheus scaler use case
Next, we will setup Prometheus over the same Minikube cluster using Helm charts.
Helm repo add prometheus-community https://prometheus-community.github.io/Helm-charts
Helm repo update
Helm install prometheus prometheus-community/kube-prometheus-stack --namespace=prometheus --create-namespace --wait
Alternatively you can setup prometheus over single VM and use the Prometheus endpoint in scaledobject yaml.
nginx-deploy-scaledobject.yaml
apiVersion: keda.sh/v1alpha1
kind: ScaledObject
metadata:
  name: nginx-deployment-memory
  namespace: default
spec:
  scaleTargetRef:
    name: nginx
  pollingInterval: 30 # Must be seconds
  minReplicaCount: 2
  maxReplicaCount: 3
  triggers:
  - type: prometheus
    metadata:
      serverAddress: http://prometheus-server.prometheus.svc.cluster.local:9090
      metricName: pod_memory_percentage_usage_nginx
      threshold: '30'
      query: sum(round(max by (pod) (max_over_time(container_memory_usage_bytes{namespace="default",pod=~"nginx.*"}[1m])) / on (pod)(max by (pod) (kube_pod_container_resource_limits{namespace="default",pod=~"nginx.*",resource="memory"})) * 100,0.01))
kubectl apply -f nginx-deploy-scaledobject.yaml
You can conduct load testing using the below kubectl command
kubectl run -i --tty load-generator-test --rm --image=busybox --restart=Never -- /bin/sh -c "while sleep 0.01; do wget -q -O- http://nginx; done"
Using Cron scaler for scaling
The following specification shows a scaledobject with a cron trigger that scales based on a Cron Schedule.
Cron scaler use case
apiVersion: keda.sh/v1alpha1
kind: ScaledObject
metadata:
  name: nginx-cron-scaledobject
  namespace: default
spec:
  scaleTargetRef:
    kind: Deployment
    name: nginx-deployment
  pollingInterval: 30
  triggers:
  - type: cron
    metadata:
      desiredReplicas: "2"
      end: 0 6 * * *
      start: 0 0 * * *
      timezone: Asia/Calcutta
KEDA enables the integration of CPU/memory triggers with other triggers. You just need to change the trigger section and specify the configuration for CPU, memory and cron, or any supported scaler. The example below demonstrates a ScaledObject that combines a cron trigger with both CPU and memory triggers.
triggers:
  - type: cron
    metadata:
      desiredReplicas: "30"
      end: 0 6 * * *
      start: 0 0 * * *
      timezone: Europe/London
  - type: cpu
    metadata:
      type: Utilization
      value: "90"
  - type: memory
    metadata:
      type: Utilization
Monitoring KEDA
Monitoring KEDA is possible through Kubernetes events, Horizontal Pod Autoscaler (HPA) metrics, and Prometheus metrics. This comprehensive monitoring approach allows for the observation and adjustment of autoscaling activities to optimize the balance between cost, time, and performance.
Scale your Kubernetes with KEDA today
KEDA represents a significant advancement in the world of Kubernetes autoscaling, particularly for event-driven workloads. By seamlessly integrating with Kubernetes deployments and leveraging its rich ecosystem, KEDA enables efficient and dynamic scaling based on various event sources such as queues, streams, or custom metrics. Throughout this blog, we've explored the key features and benefits of KEDA, including its support for multiple event sources, its lightweight and extensible architecture, and its ability to scale to zero, which optimizes resource utilization and reduces costs. Try it out yourself!

